I’ve been working on a project that I’m aiming to release with iOS 13 later this year, and I’ve decided to do some build logs with interesting features or new things I’m learning here. I talked a bit about it on twitter:
The idea for Read & Share stems from a) my interest in using some new features from iOS 13 in production and b) my newfound reading time during my commute where I wanted to share what I was reading on Twitter et al but didn’t have the tools to do so - not all of us can have that Notes.app screenshot aesthetic.
This series will be a mix of how I build features that I’m familiar with as well as experiments with the newer iOS 13 and Xcode 11 features that we’re all unfamiliar with.
Even experienced iOS engineers are newbies again with SwiftUI and Combine, and the incredible field of posts about working with new features shows how fresh even the basics are for everyone.
Let’s get right to the first build log:
The fundamental piece of UI here that everything else feeds in to and out of is the highlighting screen, so that’s where I’m starting the app. There are lots of pieces that I know how to do already (but maybe not in iOS 13, who knows!) this is at least one piece that I’m going to iterate on a lot, so I might as well get a first version in.
Text comes into the app in various ways - sharing existing highlights from e-readers, copy-pasting chunks of text and even taking camera shots from physical books - and it all hits the highlight screen where you can select the part you want to share. After that you can tweak the book source or play with the share style, but all of these other elements flow through this one interface that needs to be intuitively understandable through a range of use cases.

highlight flow
I started working on this exact interface in SwiftUI and realized that I didn’t know anything about it, then restarted it in UIKit where I was much more familiar. Eventually I’d like to rebuild all of this in SwiftUI but I’ve settled for building the easy stuff (Drawers! Navigation! Tabs!) in SwiftUI and giving myself some breathing room on the custom UI in UIKit for now.
That’s one of the nice parts about SwiftUI: you’re not completely cut off from UIKit if you don’t want to be, but there’s some boilerplate to connect the two. We’ll most likely cover this in an upcoming post too.
Making selections
The end goal here is making it easy to tap and drag to select text, which sounds easy but there are a number of steps to be able to do this easily:
- Get bounds for each word
- Get tap points
- Manage word selections
- Draw stylized highlight layers
Support for finding text bounds in UITextView is pretty good, so I’ve picked that for the base text display. I started by using firstRect(forRange:) to find rects for each word that can be selected.
Getting the our rects requires a string Range which is not quite the same as a standard index. You can refresh your Swift string knowledge here, but the short version is that we need to do some extra steps to finally get to a Range that we can use to get our word rects.
Originally I implemented this with the first method I saw, range(of: string), and it was a good starting point for validating what the rects looked like so we could use them both as the basis of the highlight shapes and to determine if taps have hit a word. Eventually though we needed to generate these ranges for each word, not just the first occurance of a word like the simple range(of: string) will give us.
Two sub-optimal parts here: first, Scanner is not as Swift-friendly as we’d like but a pointer to an optional NSString, i.e. &NSString?, will do the job when the docs say it’s looking for AutoreleasingUnsafeMutablePointer<NSString?>?. Second, this code is not very unicode-safe as it is. I’m doing some character counting here which is not directly compatible with how String tries to simplify complex multi-character glyphs into String.Index. I’ll continue to refine this component during this process, and one of those steps will include checking unicode support. For now, this’ll do fine.
The entire block scans up to the next whitespace, gets the start and end position (as UITextPosition) for each word, uses that to get a UITextRange which in turn is used to get a CGRect for that word. Text is static once it’s in the highlighter (for now), so computing everything upfront makes sure we have all the data we need for the rest of our highlighting step.
func loadRects(fromTextView textView: UITextView) {
    var rects: [WordRect] = []

    var currentScanPosition = 0
    let scanner = Scanner(string: textView.text)
    while !scanner.isAtEnd {
        var nextWord: NSString?
        scanner.scanUpToCharacters(from: .whitespacesAndNewlines, into: &nextWord)
        guard let existingNextWord = nextWord else { return }

        let startPosition = textView.position(from: textView.beginningOfDocument, offset: currentScanPosition)
        let endPosition = textView.position(from: textView.beginningOfDocument, offset: currentScanPosition+existingNextWord.length)

        if let textRange = textView.textRange(from: startPosition!, to: endPosition!) {
            let rect = trimmedRectFromTextContainer(textView.firstRect(for: textRange))
            rects.append(WordRect(withRect: rect, andText: existingNextWord as String))
        }

        currentScanPosition += existingNextWord.length + 1
    }

    self.wordRects = rects
}
Once I have the word rects, taps are sent to the selection manager which applies any selection rules. If you tap on the first word and the last word, the app should highlight all the words in the middle for you - this logic and more is all handled in the selection manager.
Finally, the view controller takes the selections and, knowing a bit about the rules for how text can be selected, makes custom CAShapeLayers displayed in the layer behind the UITextView.
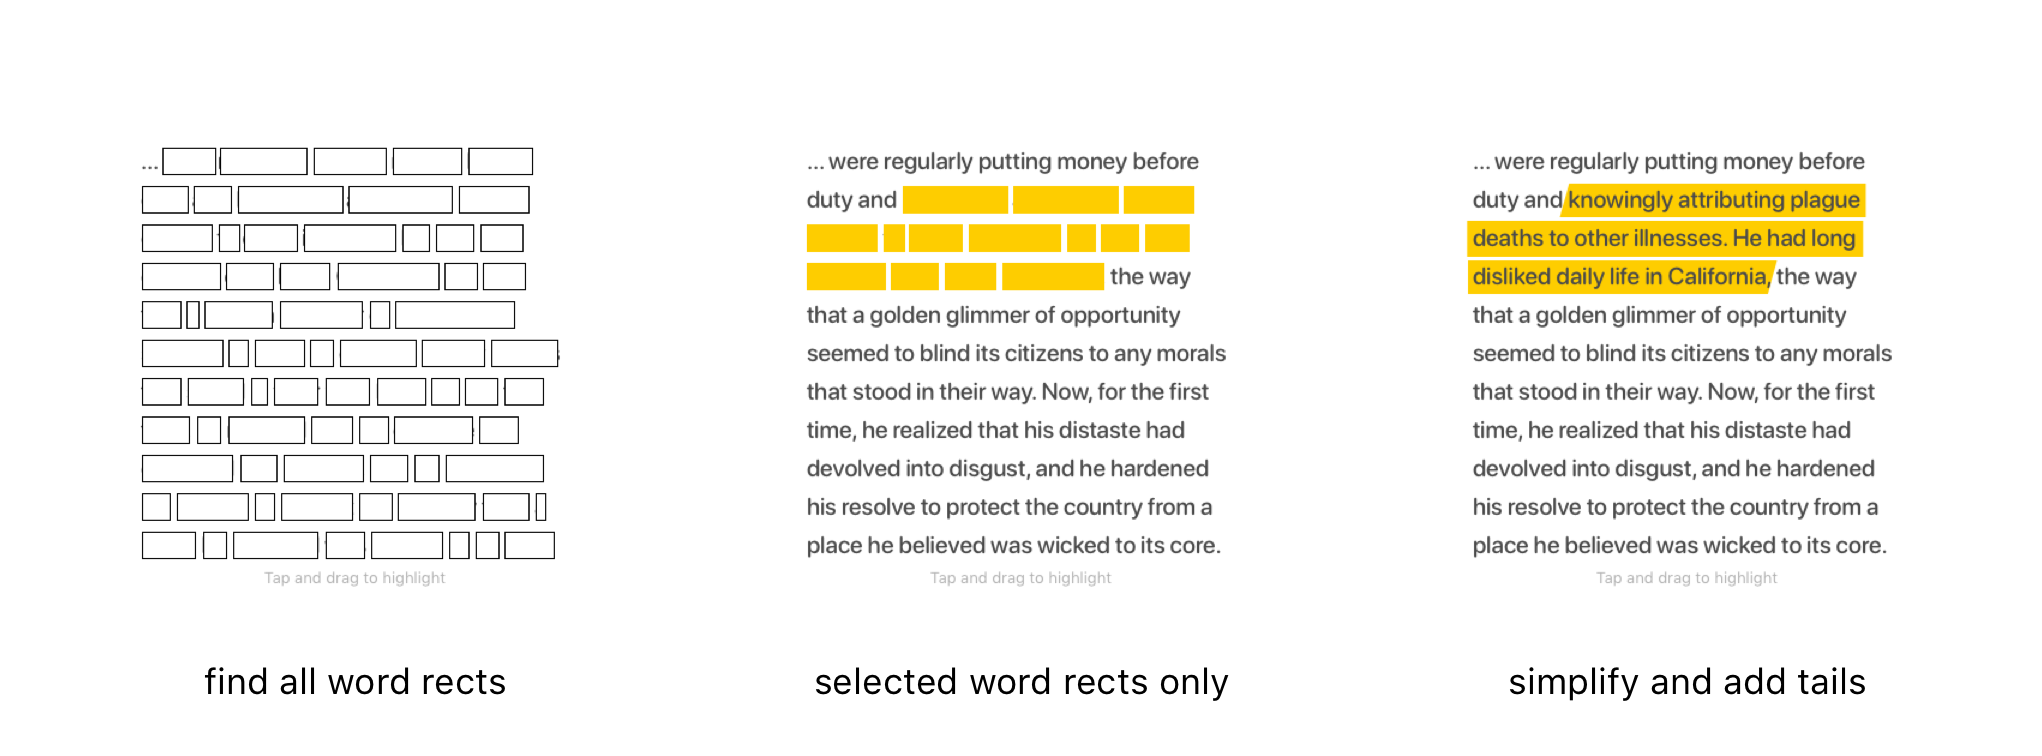
highlight process
The separation between what happens in the selection manager and the view controller is at the display level. The selection manager shouldn’t need to know anything about the layout of the screen, just the basic rules for how to select text. The parent view controller can handle both a conversion from taps → word rect hits as well as selected rects → highlight layer locations.