118th Congress District Shapefiles

I’m a big fan of minimizing external dependencies and one of the moments forming my opinion on this was dealing with mapping user location to Congressional district for 5 Calls. This is a key part of 5 Calls: you enter an address or zip code and we return a set of representatives for various levels of government, including their phone numbers and various metadata that’s useful to you.

The very first version of 5 Calls used the Google Civic API to fetch this data which worked pretty well and included a geocoder so we could pass addresses, zip codes, etc and get back a description of the federal representatives for that point. This worked OK and there was a generous free tier but it was still an external API call adding to request latency and the service was less than responsive to changes in representative information, especially one-off changes that happen outside of election cycles.

Eventually we moved to a different service that was a hobby project for another civic tech-minded programmer, but it ended up being overly complex and, being a hobby project, was even less up-to-date with the latest changes in Congressional representation. It did use elasticsearch though, which had decent support for geospatial queries so I spun out using elasticsearch by itself for a while, adding some tools to spin up a dataset of district information from geojson files.

Elasticsearch was fast enough, but still an external service (not to mention an expensive one) that we needed to make an API call to before returning representative information. One day whilst fighting an upgrade to a new version and the AWS console all in one battle, I wondered how many polygons I could just fit in RAM and query using basic point-in-polygon algorithms. And from my experimentation it turns out I could store all of the congressional districts easily in RAM (simplified, but acceptably so) and query them in much less time that an external API call took.

This simplified approach has been working great for the last few years: download district data from the unitedstates/districts repo on startup, then when a request comes in geocode an address or zip code and figure out which polygon it’s in. As is typical in programming, I thought my options were systems that optimized for searching thousands or tens of thousands of polygons when in reality I only needed to pick from ~450.

We’ve had a handful of states redistricting over the last few years which I had to handle individually, but the real test was the start of the 118th Congress when new districts from the 2020 census came into effect. Most states had their district boundaries modified in some way as the population distribution moved around in the state, and if a state changed population enough to either gain or lose a House seat the district boundaries could be significantly different as they needed to either make room for a new district or absorb the former population from a lost one.

I spent a couple weeks digging up what tools to use and how to validate the new districts in a way that would let me manage all 50 states without doing too much manual work, here’s my process:


1. Aquire Shapefiles

All states will produce a district shapefile (a format managed by Esri, one of the major GIS companies) and sometimes geojsons or KML files, shapefiles were the common denominator so I only used those regardless of what else a state offered for download. Generally the congressional district shapefile is available on a legislature or state court website first, then eventually the census website. This part takes some googling.

2. Split And Convert

We (rather, the folks who run the unitedstates/districts repo) want each district in its own geojson file… alongside a KML file that has exactly the same info, but we’re interested in the geojson format for our own usage. Seeking to convert from a shapefile to geojson file leads to a number of tools and paths but a simple yet robust option seemed to be the mapshaper tool.

Combining a number of our tasks into one command, we can split a big shapefile into individual district geojson files, simplifying the paths and slimming the overall file size by reducing the precision by using this command:

mapshaper -i GA.zip -split -simplify 15% -o ga/ format=geojson precision=0.000001

Our input, GA.zip here, is four shapefile components, dbf, prj, shp, and shx files all zipped up into one archive. mapshaper is really powerful! I was surpised I could do so much with just running one command and there are lots of options for processing shape formats in various ways that I didn’t end up using.

Simplification reduces the amount of points in the shape to a percentage of the original points, with some heuristics to maintain shape detail when possible. I tried to simplify into a similar filesize as before, i.e. if all of Alabama’s geojsons were ~500kb previously, I tried to hit that number again with the assumption that anyone currently reading the files into memory would be able to do the same with these updated shapes. Some of the sources are quite large and leaving them unsimplified would surely break some implementations that depend on this data.

I could probably use a more rigorous approach as to how complex the shapes should be for the purpose but in the absence of that, this seemed like the best way to aim for a particular size.

Reducing the precision to 6 decimal places means that we can only tell distances down to a tenth of a meter but that seems like a fair tradeoff for our usecase as well.

Sometimes this complains (warns, but doesn’t fail) on there not being a projection available. If you miss it during this pass, you’ll definitely notice the very large floats as points in your geojsons later. The solution is to force the wgs84 projection with -proj wgs84 as part of the mapshaper command.

3. Validate

Now the nitty-gritty. How had each of these states formatted their files? Did they include relevant metadata for their districts? We needed to be sure that we had the right districts mapped to the right representatives across ~450 files without doing everything by hand - as well as creating folders and files in the correct place for the repo that we are contributing to1.

There’s no great way around this: I had to parse the json, being flexible for various ways states had described their districts, and then reformat them correctly before writing out the files. Go is not a great choice for this given its somewhat strict JSON parsing behavior but I can always churn out some Go without much thought to syntax or special libraries so I picked that.

This mostly went without drama. I did assume originally that the shapefiles listed each district sequentially and numbered them as such before realizing that is absolutely not a good assumption and going back to parse whatever district number was in each shape metadata. The only hangup here was Michigan which for some reason misnumbered its districts in the original shapefile.

The code in question is in my fork of the district repo (it probably will not be merged to the original one) and can be run with go run . -state GA.

4. Add KML

The repo wanted KML files sitting alongside the geojson files so I had to figure out how to generate KML files from geojson files. Unfortunately KML is not supported by mapshaper so I had to look elsewhere. One of the other options that I had originally considered for converting shapefiles originally was ogr2ogr from the GDAL library. It didn’t have the processing options I was looking for but it could easily turn a geojson file into a KML file, so a little bash was able to convert all the district files for each state:

for i in {1..8}
do 
    ogr2ogr WI/WI-$i/shape.kml WI/WI-$i/shape.geojson
done

Other than a couple minor fixes for importing the files into the 5 Calls API during startup, that was the whole processing pipeline for all 50 states’ worth of district files. Most states went smoothly through all the steps without any manual intervention but naturally the states with weirdness took a bit of time to work out the special cases.

I’m pretty happy now with both the way we consume the files as well as how they’re processed. I could easily redo this again in ten years (!!!) and I imagine I’d only have to make minor changes.


  1. [1] unitedstates/districts is supposed to be CC0-licensed data, i.e. reformatting of free data published by the government itself. I didn’t get all my data from sources that would be OK with republishing so I’ll wait until the census publishes the shapefiles before I submit something that can be PR-able to the original repo. ↩︎

Finally, Apple Music cadence playlists for running

I took about a month off between my last job and my current one to ostensibly do some work around the house but also to wrap up work on my running music app that I’ve been working on; Runtracks.

The inspiration was simple: when a track comes on while you’re running and it perfectly matches your step cadence, it feels great! Why can’t we do this for every track in your running playlist?

Runtracks is a set of curated tracks from Apple Music that are perfect for running, combined with software that adjusts the beat of the music to match your run cadence.

And honestly, it’s great to use. I have been running mostly on a treadmill since covid began and being able to dial in a speed and cadence and have music to go along with it just feels great. More recently I have started running outside again and the experience is just OK - hills will make you speed up or slow down just enough to get out of sync - but that’s nothing a few more features can’t fix.

Right now it’s 100% free to use, other than having to be an Apple Music subscriber already. Like any good app, the software is only half the story and regular content updates is really what makes it continually valuable. As a few features solidify and I feel more comfortable focusing more on content and less on the core functionality, I’ll probably add a very cheap subscription option to keep the content flowing.

If you’re a runner (or if you’re not and want to be!), download Runtracks on the app store and give it a shot. As always, shoot me some feedback if you have ideas for features or if you had a good run.

Home Temperature Logging with homebridge, Influxdb and Grafana

We recently were able to buy our first house (!!! it does still seem a bit surreal) and a flood of projects that I’ve never quite been able to commit to in a rental have been added to my todo list.

One of those was setting up historical temperature charts for indoor spaces, and in general just building out some fun homekit integrations without shelling out lots of $$$ for expensive sensors. You can definitely achieve this without homekit and homebridge in the middle if you don’t care about that part but the homekit plugins do provide some plumbing to connect bluetooth to mqtt to influxdb with only light configuration.

This is the culmination of a twitter thread I started a while back:

sensor choice

I started with a few homekit native temperature sensors, the cleargrass CGG1 model, which were expensive but very easy to connect directly to homekit. Unfortunately there’s no way to get data out of homekit, so to plot the values over time you need an intermediary to fetch the sensor data over bluetooth and then you can fake a new accessory that homekit can display, hence the connection through homebridge.

All of the common sensor models I looked at have some sort of encryption around the data they transmit, so you have to get the “bindkey” through various semi-hacky gist paste methods. It seemed like other folks were able to decrypt the CGG1 bindkey using fake android apps or syncing their hardware with some cloud service and then fetching it via an API, but none of those methods ended up working for me and the CGG1.

That rabbit hole lead me to another sensor that was significantly cheaper because it had no native homekit integration (which I didn’t want now anyway) and a slightly smaller screen: the Xiaomi Mijia LYWSD03MMC. Rather than $30 per sensor, these could be purchased for as low as $5 each in packs of four!

Even better, the LYWSD03MMC seemed like it had some of the best tooling for installing custom firmware which removed the data encryption and added some extra features. I purchased two to get started.

bluetooth hardware

Before I get into how everything connects together, a short interlude on bluetooth on Ubuntu. It’s awful and I spent too much time fighting it versus just doing the thing I wanted to accomplish.

Or at least the native chipset in the little M1T hardware I’m using sucks. Lots of people report success with using bluetooth on Raspberry Pi models, which is a common platform for homebridge installations. You can see my whole journey in the twitter thread, but the short version is that the bluetooth device would disappear entirely after 6-to-12 hours and no amount of sudo hciconfig hci0 reset would fix it. Or any other bluetooth incantation short of a system restart for that matter.

I ended up getting a tiny bluetooth dongle from TP Link, their UB400 model, which a) was plug-and-play on linux, if you can believe it b) had significantly better range than internal bluetooth and c) didn’t constantly disappear from the machine.

Don’t fight flaky bluetooth chipsets on linux. Just get a cheap dongle that is well supported.

reflashing the sensors

Not nearly as scary as reflashing devices used to be. Here is a web reflasher (yes, really!) for these devices. You have to enable the#enable-experimental-web-platform-features flag in Chrome, instructions for that are on the page.

The UI is not great here but it’s a fairly simple process and you can do it on any machine with bluetooth, not just the homebridge server.

  • Download the firmware from the “Custom firmware repo” link on that page, it’s a ATC_Thermometer.bin file
  • Enter the BLE device name prefix so you don’t see every bluetooth device nearby. If stock firmware, use LYWSD03 but after you flash it, it will appear as ATC (the name of the firmware) instead
  • Click Connect
  • After a few seconds you should see the device pop up in the bluetooth pairing window of Chrome. Select it and Pair
  • The log at the bottom of the window will tell you when it’s connected
  • Click Do Activation when it’s connected
    • You can ignore the token and bindkey, we’ll be disabling it with the new firmware
    • If the MAC address like A4:C1:38:B7:CB:10 shows up in the Device known id field, note it somewhere but this was hit or miss for me and we can get the MAC later as well
  • Select the previously downloaded firmware file at the top of the page under Select Firmware and click Start Flashing, it’ll take 20 seconds or so to finish up
  • Once it restarts, customize with the controls in the middle section of the page to your liking, I selected:
    • Smiley: Off
    • Advertising: Mi-like
    • Sensor Display: In F˚
    • Show Battery: Enabled
    • Advertising Interval: 1 min
  • After selecting each of these, the sensor will update with the new setting immediately. You MUST click Save current settings to flash to persist your settings between restarts
  • If you didn’t get the MAC from the earlier step, simply remove the battery and pop it back in to restart the sensor. The new firmware ensures that while booting the humidity digits will read out the last three bytes from the MAC address, the first three are always A4:C1:38

connecting the dots

Now it’s “just” a matter of stringing all the components together. Here is a list of the bits and pieces that are connected:

Locally:

Somewhere (local or remote):

  • InfluxDB
  • Grafana

I’m opting not to run Influx and Grafana myself because the free cloud offerings are a good start. Grafana is really just a frontend to influx data and thus doesn’t even need to be running most of the time, so Heroku is a good option if you want to run it yourself (tailscale even offers a nice way to spin one up that lives on your tailscale network). The limitation on the free offering is 30 days data retention on influx and the next tier is usage-based, which I imagine would be reasonable for the amount of data we’re throwing at it.

Once you have influx set up, you can configure the next step: sending data to influx with telegraf. Install telegraf using the standard instructions.

[[inputs.mqtt_consumer]]
servers = ["tcp://localhost:1883"]
topics = [
  "sensors/#",
]
data_format = "csv"
csv_header_row_count = 0
csv_skip_columns = 0
csv_column_names = ["value"]
csv_column_types = ["float"]
csv_delimiter = " "

[[outputs.influxdb_v2]]
urls = ["https://us-west-2-1.aws.cloud2.influxdata.com"]
# an auth token from influxdb cloud, Load Data -> API Tokens -> Generate API Token
token = "XXXXX"
# your email or org id from your influxdb account
organization = "email@example.com"
# your bucket name, create this on influx first, Load Data -> Buckets -> Create Bucket
bucket = "homebucket"

Create a config file like this in /etc/telegraf/telegraf.d/, naming it something like mqtt-to-influxv2.conf. You can throw it all in a single top level .conf file too but it’s nice to be organized. Restart telegraf. Telegraf will now forward from mqtt to your influxdb instance.

Note the topics section. We’ll be organizing our mqtt topics to look like sensors/garage/temperature so this tells telegraf to forward everything that starts with sensors/.

Next step: forwarding messages via mqtt. Install mosquitto (mqtt) and a client in case you need to test the output. Generally you can do sudo apt-get install mosquitto mosquitto-clients or the mqtt github readme for other platform instructions.

If you need to test that mqtt messages are being sent, you can use mosquitto_sub -h 127.0.0.1 -t sensors/# -v and it will display messages as they arrive. No other mqtt config is required.

Next step: sending messages from your bluetooth devices to mqtt.

I won’t get into installing homebridge, but I highly suggest you add homebridge-ui to manage your instance. That way you can pop this url for the mi temperature sensor into the plugin search and install it easily.

Once it’s loaded into homebridge, use homebridge-ui to configure the plugin by using the Settings link on the plugin page. It should have your first accessory already created and you should fill in these values:

  • Device MAC address: the MAC address we got while flashing the device
  • Expand the MQTT section
    • Broker URL: mqtt://localhost:1883
    • Topics: use a format like sensors/garage/temperature as we discussed above, and name your temperature, humidity and battery topics distinct names
  • Save and restart homebridge

Click Add Accessory to duplicate these fields for another sensor, so you can add as many as you like, but be sure to change the MAC and mqtt topics at a minimum.

If you’re you’re not down with homebridge-ui and are writing your homebridge config by hand, use the plugin docs to figure out which json config keys to use for the same items above.

I cribbed a lot of the setup from homekit to mqtt to telegraf from this reddit post on building a homebridge to grafana pipeline, updating it for the influxdb_v2 output. I think the order of operations is weird in that post but the config steps do work out in the end.

That’s it! Your sensors should be publishing data to mqtt, which is passing it to telegraf, which is adding it to your influxdb instance.

graphing your data

The last step is exploring your data on influx and grafana to configure a dashboard. This is subjective depending on what you want to see, so you can play around with it as you see fit. Some guidance to get started though:

Queries are arguably better to design in influx since you can more easily browse what data is available using the Data Explorer tool. You can click through your bucket’s data to roughly select the data you’re looking for, then click Script Editor to get a query for that data which can be pasted into a grafana panel.

For example, here’s a query from one of my temperature panels:

import "math"

convertCtoF = (tables=<-) => 
  tables
    |> map(fn: (r) => ({
        r with
        _value: (r._value * 1.8) + 32.0
      })
    )

from(bucket: "homebucket")
  |> range(start: v.timeRangeStart, stop: v.timeRangeStop)
  |> filter(fn: (r) => r["_measurement"] == "mqtt_consumer")
  |> filter(fn: (r) => r["topic"] == "sensors/garage/temperature")
  |> convertCtoF()
  |> aggregateWindow(every: v.windowPeriod, fn: mean, createEmpty: false)
  |> yield(name: "mean")

The bottom part from(bucket: "homebucket"... is based on a query I created in the influx data explorer and then I added a quick conversion step from C˚ to F˚. This is influx’s flux query language which is not always easy to understand but between the reference docs and asking questions on their support forum, you can probably come up with what you want to do.

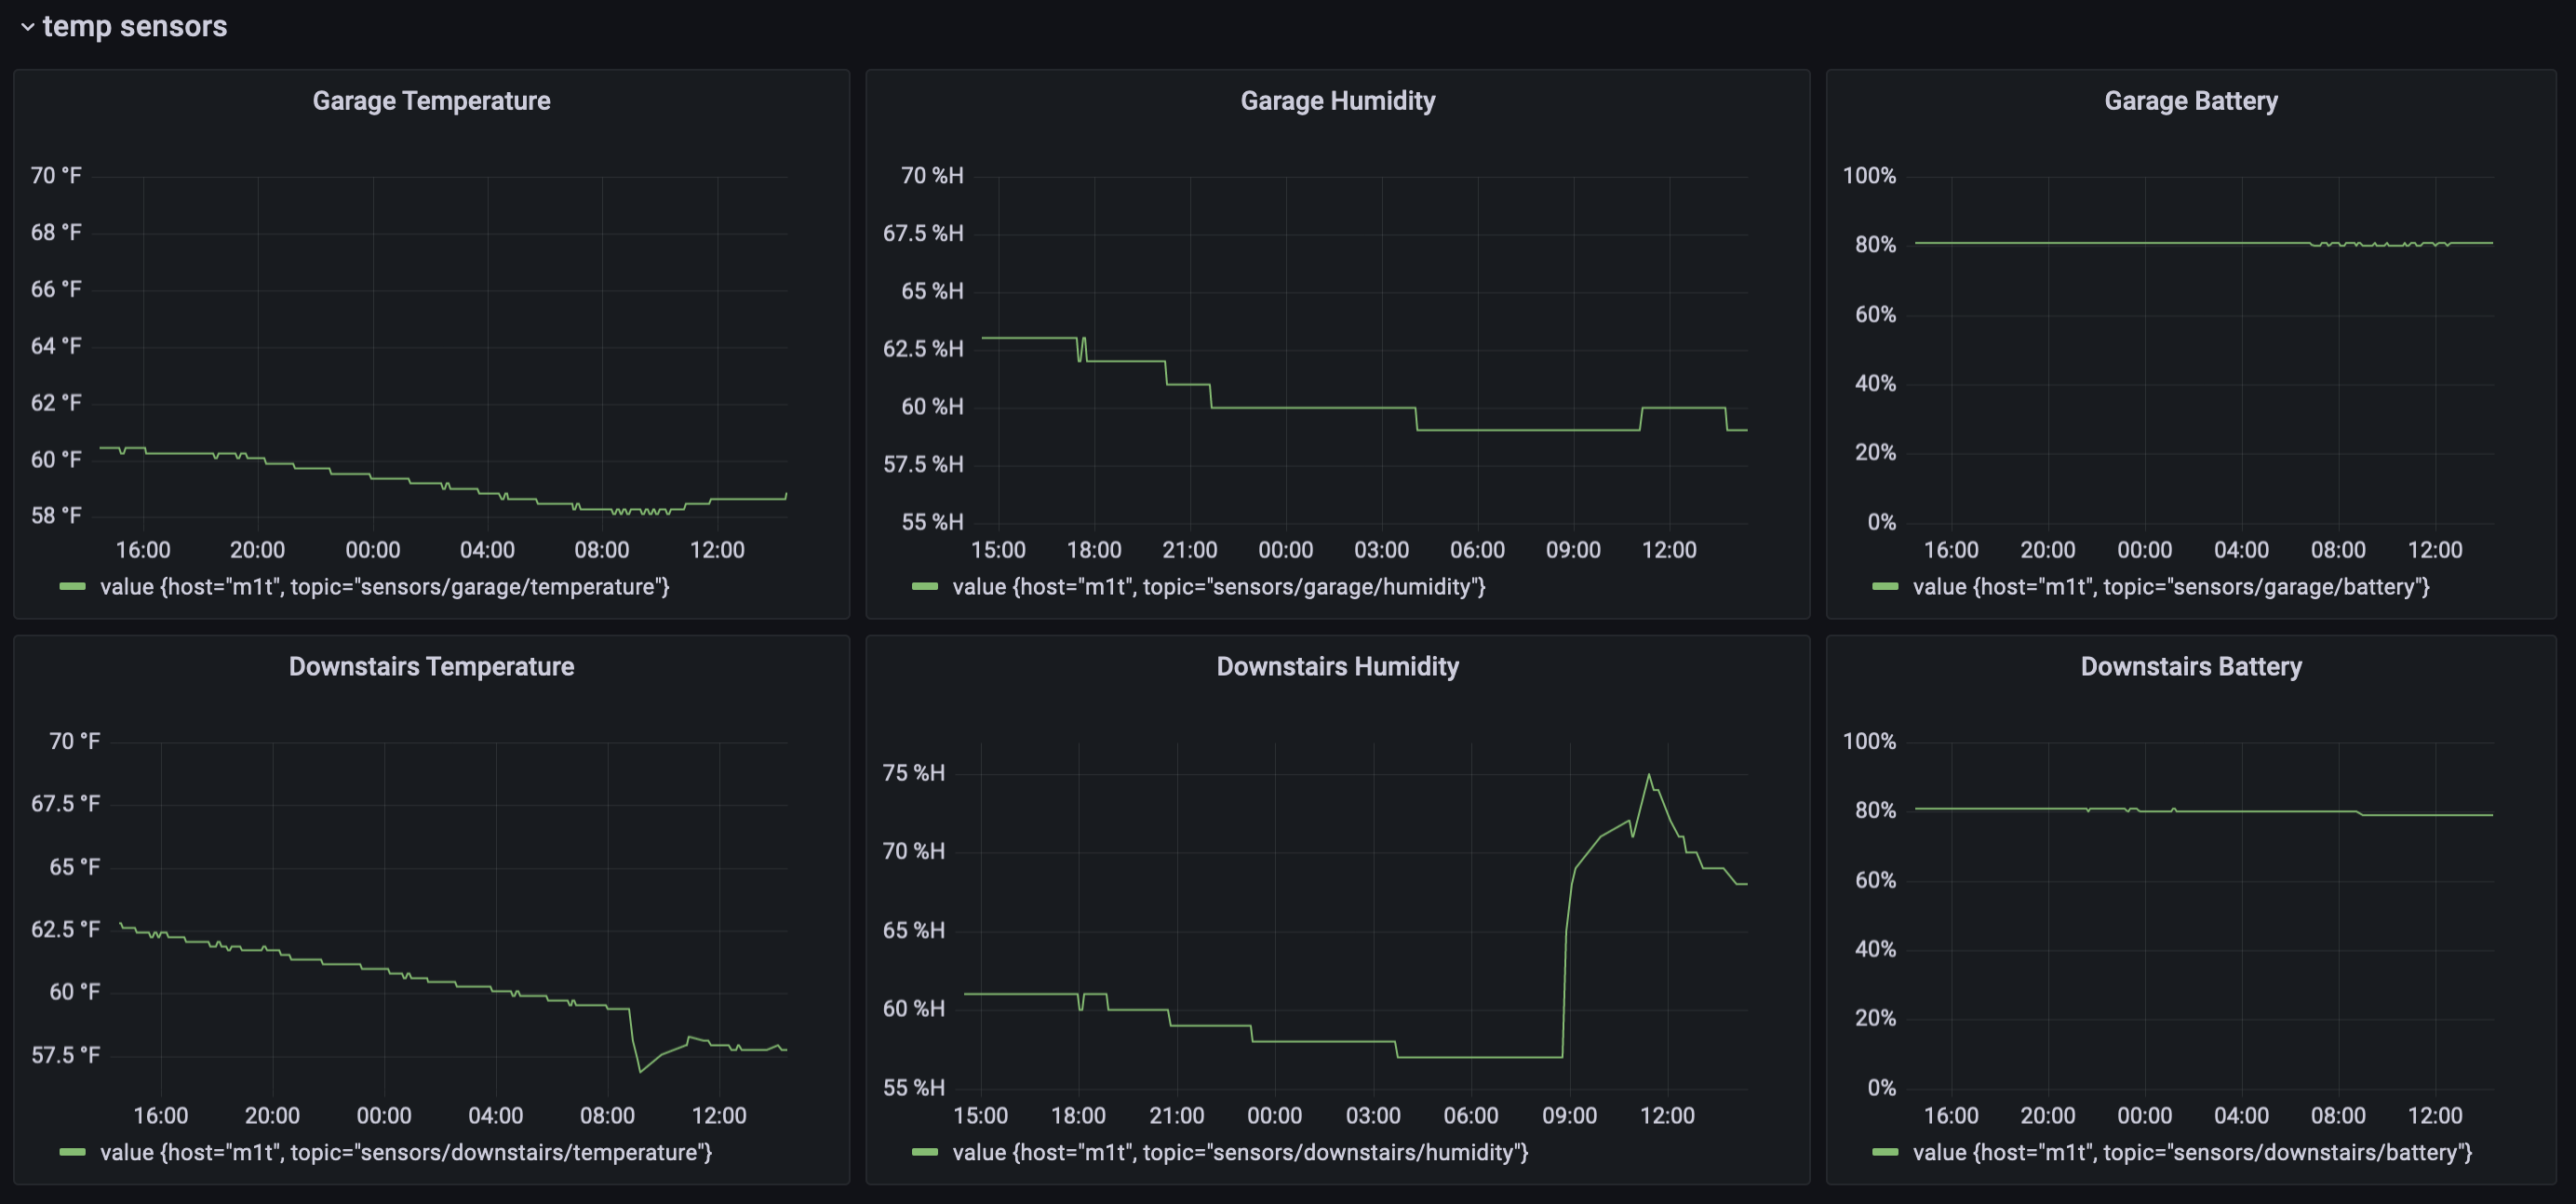
grafana graphs for two temperature sensors

Once you have the query set, you can continue to customize by adding a title, soft min and max values and, most importantly, your units.

additional sensors?

What else? Got other sensors that can be read over bluetooth and forwarded to influx? Random other things that can publish mqtt topics that are not homekit related? Now that you have the basics for an influx pipeline on your homebridge server, the possibilities are endless.

Questions? Did you extend this in fun ways? Let me know on Twitter.

Next time: let’s use our existing infrastructure to do home network monitoring!

Developer Documentation Is Awful

I’m working through a rewrite of the 5 Calls site to static publishing via hugo (same as here) but with the addition of dynamic content via small React components. I don’t see this approach in a lot of places but so far I think it’s very effective, I’ll talk about the specifics at some point in the future.

Because I’m not just building features into an existing architecture, I’m doing a lot of experimenting with how to accomplish what I want in a minimal, clean way. Some specifics about why that process is difficult for programmers follow…

Although I have a pretty good sense of React after running the regular 5 Calls site as a SPA for a few years and dealing with React Native both at my regular job and for 5 Calls’ relational app, Voter Network, I still run into situations where I want to accomplish a specific thing in React and just have no way to figure out what is the right way to do it.

This process isn’t about writing the code, it’s about understanding the purposes and limitations of the framework which is… 90% of programming. So we turn to Google to try to figure this stuff out and that doesn’t always work well:

It struck me today how incredibly low-tech this is. One side of me appreciates the community aspect of it; most cases bring you to a stack overflow question (low quality questions excepted) or a blog post on some engineer’s website which can be incredibly informative. But the other side of me wonders why there is so much room for instructions on how to accomplish things.

I’ve returned to this a few times recently as I’ve been evaluating projects that I’m working on. We get hung up on “I’m an engineer that knows Swift” or whatever language when that’s barely 10% of the actual work for most engineering jobs. I am relieved when I hit part of a project that only requires writing logic in language x because it’s so straightforward, even for languages that I’m not super familiar with.

Unless you’re at unspecified fruit company writing actual subsystems, you’re mostly working within frameworks and libraries that you’ve decided to use and architecting your code around how those parts work is vastly more difficult than structuring the code itself.

With that in mind, why is documentation so insufficient? Even for a large, well maintained project like React it’s difficult to find out what the right pattern is for what your code is trying to do. High-level examples are exceedingly hard to find, particularly when they do something outside of the norm.

No grand resolutions on how to deal with this. Just thoughts on what’s broken for now.

Custom Homebridge Plugin for Garage Homekit

Funny story, a few weeks ago I locked myself out because technology. I left the house via the garage to see some neighborhood commotion and realized when I came back that I had been hoodwinked by my own code.

You see, I typically let myself in via a custom developer-signed app that travels out over the internet, back in to the house via a reverse proxy and then triggers an Arduino+relay connected to the door opener. It’s got… a few single points of failure. But it has been quite reliable until that week when I left the house without checking the app first. Developer certificates for apps only last until your current membership expires (at most a year if you installed an app on the day you renewed your membership) and mine had renewed since the last time I used the app - one of the secret perils of extended work-from-home I guess.

But everything worked out and I was able to get back in relatively quickly (quoth @bradfitz: “luckily you have a friend with backdoor access to your home network”) but it prompted me to tackle a project I had been putting off for a while; migrating from a custom app to a custom homebridge plugin.

HomeKit is by far more optimal for this use case: I can ask Siri to trigger it without writing my own Siri intents (which I did for the original app - except HomeKit has a monopoly on asking Siri to open the garage so I had to configure it for “hey Siri open the thing”), the user interface is built-in to the HomeKit app and won’t expire periodically, and I can rely on HomeKit Apple TV home hub rather than a reverse proxy. Less stuff I have to maintain or debug, and the only way I can be truly locked out is if the power is shut off.

getting started

As is customary, the actual code to wire all this stuff up is trivial but understanding the concepts behind the homebridge API is not.

I already had homebridge set up and configured for another project so I focused on how I could create a custom plugin for homebridge and connect it to my existing installation. I started by forking this example plugin project for homebridge: https://github.com/homebridge/homebridge-plugin-template

The installation instructions were great and I had the plugin showing up in homebridge-ui immediately.

Here’s where things start to get tricky: HomeKit garage door support is built with the idea that there’s a sensor that can detect if the garage door is open or closed. This isn’t typically something a non-smart garage door can tell. It’s got a toggle that opens, closes or stops movement from the garage door and your eyes and brain are the indicator that the door has completed opening or closing.

If you look at the Homebridge Garage Door service API docs, you’ll note that it handles a few different states. There is no “toggle garage door” command, but there are triggers for setting the CurrentDoorState and TargetDoorState. In an ideal world we’d trigger the garage door toggle, set TargetDoorState to open, wait for the garage to open and then set CurrentDoorState to open.

Next time:

How to structure your homebridge plugin, and trying things the hard way…

New Zealand Flax Pods

Earlier this year I noticed one of the bushes in the backyard was sending off a bunch of flowers, more than I’ve ever seen on this one bush for sure, and now they’ve fulled developed into seed pods. These were impressive even when they were pre-bloom, they’re probably 8 feet tall and there are something like 10 flowers per stalk over seven stalks that the plant produced this year.

I thought these were super fascinating so I grabbed a few pictures. Turns out these are a variety of Phormium, or New Zealand flax, with bright pink stripes along the side of the broad leaves.

Seeds from New Zealand flax bush

Putting on my very unofficial botanist hat, the pods most likely open up and let their seeds out when they’re still quite high above the ground. The seeds, inside their disk-shaped hulls, then catch the wind, spreading farther than they would if they just dropped directly down.

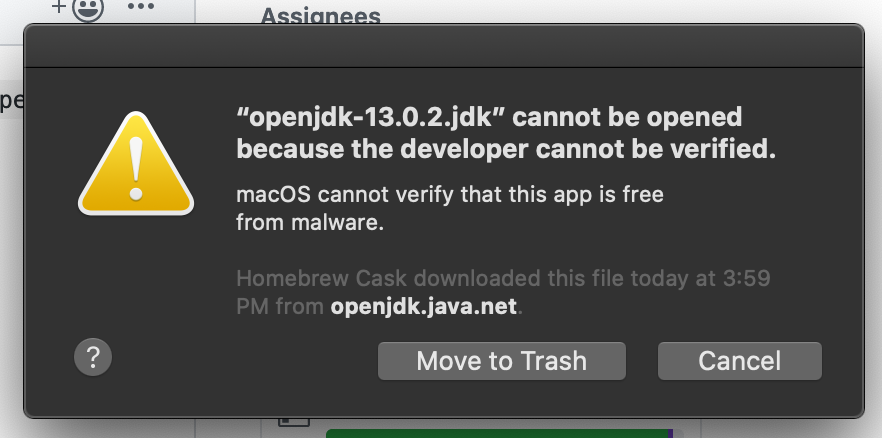
openjdk cannot be opened because the developer cannot be verified when installing adb via brew

openjdk cannot be opened because the developer cannot be verified when installing adb via brew

If you’re like me and enjoy the simplicity of installing command line tools using the brew command on macOS, you’ve likely run into one or two cases where Catalina prevents you from running a tool that’s been installed because it hasn’t been verified.

In this case, I’m installing the android developer tools for React Native development and needed both adb and openjdk. I’ve used both of these commands to install them:

  • brew cask install android-platform-tools
  • brew cask install java

This situation is similar to downloading a new Mac app from any developer online. Some developers want to distribute apps without the restrictions placed on them by Apple and can run unsigned code - with some restrictions.

The Solution

The issue is that macOS labels all downloaded binaries with a “quarantine” attribute which tells the system that it should not be run automatically before being explicitly approved by the user.

If you’re installing an app, the sneaky way to allow opening unsigned code is to use Right Click -> Open rather than double clicking on the app icon itself. That’ll allow you to approve removing the quarantine and you can open with a double click next time.

This even works in some cases with command line tools: you can use the open some/path/to/a/folder from Terminal to open a folder in the finder that contains adb and then right click it to get the standard bypass quarantine prompt.

The JDK is more tricky since it’s a folder and not an application. You can’t just right click to launch it, instead you have to manually remove the quarantine attributes from the folder where it’s been downloaded. You can do this easily in the terminal with this command:

xattr -d com.apple.quarantine /Library/Java/JavaVirtualMachines/adoptopenjdk-13.0.1.jdk

The command line tool xattr is used for modifying or inspecting file attributes on macOS. The -d flag removes an attribute, com.apple.quarantine is the quarantine attribute for unsigned code we discussed earlier and the final argument is the path to the file. Your jdk might have a different version or a different tool might be in an entirely different location.


As usual, quarantine is there to protect your computer from unsigned software. Please ensure you trust the developer you’re running unsigned code from before opening it on your machine.

React Native, Typescript and VS Code: Unable to resolve module

I’ve run into this problem largely when setting up new projects, as I start to break out internal files into their own folders and the project has to start finding dependencies in new locations.

In my case, it was complaining about imports from internal paths like import ContactPermissions from 'app/components/screens/contactPermissions';.

The error message tries to help by giving you four methods for resolving the issue, which seem to work only in the most naive cases:

Reset the tool that watches files for changes on disk:

watchman watch-del-all

Rebuild the node_modules folder to make sure something wasn’t accidentally deleted

rf -rf node_modules && yarn install

Reset the yarn cache when starting the bundler

yarn start --reset-cache

Remove any temporary items from the metro bundler’s cache

rm -rf /tmp/metro-*

These cases might work for you if your problem is related to external dependencies that may have changed (maybe you changed your node_modules without re-running yarn or installed new packages without restarting the packager).

In the case with VS Code, this did not resolve my issues. I was still running into issues where modules could not be found.

The Solution

The problem here turned out to be related to VS Code’s typescript project helper. When I referenced existing types in my files, VS Code was automatically importing the file for me - this is usually very helpful!

But for whatever reason, the way my app is set up means that even though VS Code could tell where app/components/screens/* was located (an incorrect import path usually causes VS Code to report an error on that line), typescript had trouble determining where this file lived from this path. Even being more specific about the start of the path with ./app/components/... was not working for the typescript plugin.

What did work was using relative paths in my typescript files. So instead of referencing files from app/components/screens/contactPermssions, I would use ../components/screens/contactPermissions for a file that was located in a different subdirectory of app.

This can be difficult to do manually (remembering what path you’re in and how many directories to go back up, etc), but VS Code can also generate and change these imports for you if it’s configured to do so.

Navigate to your workspace settings, search for typescript import and change the Typescript Import Module Specifier to relative from auto.

Or, do this in your preference json:

"typescript.preferences.importModuleSpecifier": "relative"

FFmpeg exited with code 1, Homebridge and Homekit configuration with Axis camera

If you’re trying to use the homebridge-camera-ffmpeg plugin for homebridge to connect your IP camera to Homekit, you may have run into issues with ffmpeg exiting with code 1 when trying to stream. This usually means ffmpeg can’t launch with the options provided in your camera configuration, but many different things can be going wrong and it’s hard to debug.

[1/18/2020, 8:27:54 PM] [Camera-ffmpeg] Snapshot from Front door at 480x270
[1/18/2020, 8:27:56 PM] [Camera-ffmpeg] Start streaming video from Front door with 1280x720@299kBit
[1/18/2020, 8:27:56 PM] [Camera-ffmpeg] ERROR: FFmpeg exited with code 1

There are lots of ways this can go wrong, so here are some steps to figure out where you might be having issues.

The Solution

First, confirm ffmpeg is installed and runs on your homebridge server. Just run ffmpeg at the command line and confirm it runs. Here’s what running it successfully looks like:

ffmpeg version 2.8.15-0ubuntu0.16.04.1 Copyright (c) 2000-2018 the FFmpeg developers
  built with gcc 5.4.0 (Ubuntu 5.4.0-6ubuntu1~16.04.10) 20160609
  configuration: --prefix=/usr --extra-version=0ubuntu0.16.04.1 --build-suffix=-ffmpeg --toolchain=hardened --libdir=/usr/lib/x86_64-linux-gnu... etc

You may want to note the codecs that ffmpeg has been installed with. For my particular Axis camera, it was important to have h264 support so you’ll look for --enable-libx264.

Next, you need to make sure you have the right video and image source URLs for your axis camera. There are quite a few variations. Here is how the full configuration looks:

{
  "platform": "Camera-ffmpeg",
  "cameras": [
    {
      "name": "Front door",
      "videoConfig": {
        "source": "-rtsp_transport tcp -i rtsp://user:pass@1.2.3.4/axis-media/media.amp",
        "stillImageSource": "-i http://1.2.3.4/jpg/image.jpg?size=3",
        "maxStreams": 2,
        "maxWidth": 1280,
        "maxHeight": 960,
        "maxFPS": 30,
        "vcodec": "h264"
      }
    }
  ]
}

Both source and stillImageSource urls can be looked up on this axis endpoint chart. Note that you need to add a username and password in the URL if configured, and of course substitute your own camera IP in for 1.2.3.4.

Lastly, if you still can’t figure out what’s going wrong, enable debug mode for your homebridge-camera-ffmpeg source and get more information:

...
  "maxFPS": 30,
  "vcodec": "h264",
  "debug": true
...

This will give you more info about what the plugin sees from your camera and what the result of the ffmpeg call is when trying to fetch the stream. You should attempt to look at the video stream in Homekit to kick off the ffmpeg process.

xcodebuild: error: Could not resolve package dependencies with Fastlane and Swift Package Manager on CircleCI / Bitrise

The Problem

If you’re running tests on your iOS build CI pipeline with fastlane, you might run into an issue when running scan using Xcode 11+ if you’ve got some Swift package manager dependencies. The full error might look like this:

[18:44:50]: ------------------
[18:44:50]: --- Step: scan ---
[18:44:50]: ------------------
[18:44:50]: $ xcodebuild -showBuildSettings -workspace FiveCalls/FiveCalls.xcworkspace -scheme FiveCalls
[18:44:53]: Command timed out after 3 seconds on try 1 of 4, trying again with a 6 second timeout...
xcodebuild: error: Could not resolve package dependencies:
  An unknown error occurred. '/Users/vagrant/Library/Developer/Xcode/DerivedData/FiveCalls-gpqeanjdlasujldgqrgmnsakeaup/SourcePackages/repositories/Down-9f901d13' exists and is not an empty directory (-4)
xcodebuild: error: Could not resolve package dependencies:
  An unknown error occurred. could not find repository from '/Users/vagrant/Library/Developer/Xcode/DerivedData/FiveCalls-gpqeanjdlasujldgqrgmnsakeaup/SourcePackages/repositories/Down-9f901d13/' (-3)

Coming from this fastfile:

  desc "Runs all the tests"
  lane :test do
    scan(workspace: "MyProject.xcworkspace",
         scheme: "MySchemeName")
  end

The problem here is that Xcode is resolving package dependencies and the build system isn’t waiting for that process to complete. Usually this works fine locally, so something is off with the CI timing here.

The Solution

According to this issue on the fastlane github, the problem should be resolved by updating fastlane to 2.138.0+. That didn’t fully resolve the issue for me, and there’s another way to force updating dependencies before building.

You can force xcodebuild to resolve the dependencies in a separate step beforehand, and scan won’t run until this completes.

  desc "Runs all the tests"
  lane :test do
    Dir.chdir("../MyProject") do
      sh("xcodebuild","-resolvePackageDependencies")
    end
    scan(workspace: "MyProject.xcworkspace",
         scheme: "MySchemeName")
  end

In this example our fastfile is in a fastlane directory adjacent to our project directory, so to move from the fastlane directory to our project, we move up one directory and into our project directory (the one with our xcproject file). You may need to adjust this for your project setup.

Should you write your app in SwiftUI?

I’ve hit a few roadblocks when working on Read & Share and I’m working on building separate screens in isolation while I wait for improvements from the next Xcode and SwiftUI beta (maybe next week?) to really tie things together.

It’s frustrating to not be able to move forward on the whole app flow, and I will admit that once or twice I thought about rewriting the app without SwiftUI. But at the end of the day I’m making something fun for myself, I don’t have a huge deadline looming and I wanted to learn something new that I can use to prepare for the future of Swift.

Over the next few months as we hit iOS 13 release and beyond, more and more folks will be able to start using SwiftUI to develop new parts of existing apps or start apps from scratch and ask themselves if they should jump into SwiftUI - and for the pedants in the crowd, I’m using SwiftUI to mean both the SwiftUI and Combine frameworks.

Here are my thoughts from using SwiftUI for the last few months and if you should write your next app using SwiftUI:

Pros

It’s easy to get started with the basics. Apple has a really great set of tutorials for getting used to building UIs with SwiftUI and even interacting with UIKit components from SwitfUI.

If you want a taste of how developing in SwiftUI feels, these tutorials are great at walking through the logical steps of building one part of an app.

Developing your UI is significantly faster - even faster than using Storyboards! Between the visual previews that are provided on the tutorials and the speed at which you can preview your work in Xcode, this can significantly speed up the amount of time spent iterating on how your UI behaves.

Also, UI customization is not hidden in storyboards or nib configuration files. It’s all based in your SwiftUI views and not spread across multiple areas like it could be if you configured your views in nibs and code.

Refactoring UI is a simpler process. One of the great parts about SwiftUI is it’s easy to see when your view code is getting long and pull out subviews for refactoring. I’ve been noticing three distinct steps:

  1. Start building your UI in one View
  2. During active development, break out views that are complex or repeated into new Views in the same file
  3. Once the dust settles (or the new View grows in size), move these Views into their own files or groups

It’s totally reasonable to have multiple small View components in a single file, but once they start being used from multiple locations or have their own helper methods, it’s time for them to get their own file.

Lastly, let’s not forget the experience of learning something new. You’ll be learning something new, but with some of the Swifty comforts you’ve become used to. This is actually pretty fun! You can usually iterate quickly and solve your problems (as long as you don’t run into functionality blockers) like the ones that are common during the beta phase.

Cons

Starting with the obvious one: your SwiftUI apps will only work on devices with iOS 13 and higher. For those of you with a large existing install base, making everyone update to iOS 13 to get the latest updates might not be the best way to treat your users. Keep in mind older devices will still be able to get the latest version of your app available for iOS 12, but not any new updates that are iOS 13-only.

For new apps, particularly ones that are utilizing core features only available in iOS 13, this is less of an issue.

More complex tasks don’t have good example code yet. Rather than just searching stack overflow for how to accomplish a task, you might have to read the Apple docs and figure out how to put together multiple pieces that have never been written about before. There just aren’t a lot of examples for how to do things yet, and there’s a lot of new terminology to learn just to be able to sanely google about what’s going on.

Error messages can be misleading. Just like the Swift releases of yesteryear, error messages from using Combine and SwiftUI are not always the most readable or the most accurate messages.

I’ve seen frequent complaints about using [.top, .bottom] as padding EdgeSet when in fact the error was something I was doing in modifiers that follow the element the error pointed at. Sometimes error messages about lines of code being “ambiguous without more context” actually mean that the types don’t match between two calls.

A lot of these new tools are powered by generics in Swift so error messages complaining about T and U might actually be complaining about your own types that the compiler isn’t yet reasoning about correctly.

The real power of Xcode 11 comes from working in Catalina. If you’re like me and happy to jump into iOS betas after the public releases start coming out but much more hesitant about macOS betas, you’ll find that Xcode 11 on 10.14.x doesn’t have the live preview and SwiftUI refactoring power that some of the Apple tutorials mention.

These extra features are only available in 10.15 and unless you want to take that dive early, you’ll have to wait until you upgrade your main computer to take advantage of them.

Read & Share Build Log #1

I’ve been working on a project that I’m aiming to release with iOS 13 later this year, and I’ve decided to do some build logs with interesting features or new things I’m learning here. I talked a bit about it on twitter:

The idea for Read & Share stems from a) my interest in using some new features from iOS 13 in production and b) my newfound reading time during my commute where I wanted to share what I was reading on Twitter et al but didn’t have the tools to do so - not all of us can have that Notes.app screenshot aesthetic.

This series will be a mix of how I build features that I’m familiar with as well as experiments with the newer iOS 13 and Xcode 11 features that we’re all unfamiliar with.

Even experienced iOS engineers are newbies again with SwiftUI and Combine, and the incredible field of posts about working with new features shows how fresh even the basics are for everyone.

Let’s get right to the first build log:


The fundamental piece of UI here that everything else feeds in to and out of is the highlighting screen, so that’s where I’m starting the app. There are lots of pieces that I know how to do already (but maybe not in iOS 13, who knows!) this is at least one piece that I’m going to iterate on a lot, so I might as well get a first version in.

Text comes into the app in various ways - sharing existing highlights from e-readers, copy-pasting chunks of text and even taking camera shots from physical books - and it all hits the highlight screen where you can select the part you want to share. After that you can tweak the book source or play with the share style, but all of these other elements flow through this one interface that needs to be intuitively understandable through a range of use cases.

highlight flow

I started working on this exact interface in SwiftUI and realized that I didn’t know anything about it, then restarted it in UIKit where I was much more familiar. Eventually I’d like to rebuild all of this in SwiftUI but I’ve settled for building the easy stuff (Drawers! Navigation! Tabs!) in SwiftUI and giving myself some breathing room on the custom UI in UIKit for now.

That’s one of the nice parts about SwiftUI: you’re not completely cut off from UIKit if you don’t want to be, but there’s some boilerplate to connect the two. We’ll most likely cover this in an upcoming post too.

Making selections

The end goal here is making it easy to tap and drag to select text, which sounds easy but there are a number of steps to be able to do this easily:

  1. Get bounds for each word
  2. Get tap points
  3. Manage word selections
  4. Draw stylized highlight layers

Support for finding text bounds in UITextView is pretty good, so I’ve picked that for the base text display. I started by using firstRect(forRange:) to find rects for each word that can be selected.

Getting the our rects requires a string Range which is not quite the same as a standard index. You can refresh your Swift string knowledge here, but the short version is that we need to do some extra steps to finally get to a Range that we can use to get our word rects.

Originally I implemented this with the first method I saw, range(of: string), and it was a good starting point for validating what the rects looked like so we could use them both as the basis of the highlight shapes and to determine if taps have hit a word. Eventually though we needed to generate these ranges for each word, not just the first occurance of a word like the simple range(of: string) will give us.

Two sub-optimal parts here: first, Scanner is not as Swift-friendly as we’d like but a pointer to an optional NSString, i.e. &NSString?, will do the job when the docs say it’s looking for AutoreleasingUnsafeMutablePointer<NSString?>?. Second, this code is not very unicode-safe as it is. I’m doing some character counting here which is not directly compatible with how String tries to simplify complex multi-character glyphs into String.Index. I’ll continue to refine this component during this process, and one of those steps will include checking unicode support. For now, this’ll do fine.

The entire block scans up to the next whitespace, gets the start and end position (as UITextPosition) for each word, uses that to get a UITextRange which in turn is used to get a CGRect for that word. Text is static once it’s in the highlighter (for now), so computing everything upfront makes sure we have all the data we need for the rest of our highlighting step.

func loadRects(fromTextView textView: UITextView) {
    var rects: [WordRect] = []
    
    var currentScanPosition = 0
    let scanner = Scanner(string: textView.text)
    while !scanner.isAtEnd {
        var nextWord: NSString?
        scanner.scanUpToCharacters(from: .whitespacesAndNewlines, into: &nextWord)
        guard let existingNextWord = nextWord else { return }
        
        let startPosition = textView.position(from: textView.beginningOfDocument, offset: currentScanPosition)
        let endPosition = textView.position(from: textView.beginningOfDocument, offset: currentScanPosition+existingNextWord.length)
        
        if let textRange = textView.textRange(from: startPosition!, to: endPosition!) {
            let rect = trimmedRectFromTextContainer(textView.firstRect(for: textRange))
            rects.append(WordRect(withRect: rect, andText: existingNextWord as String))
        }
        
        currentScanPosition += existingNextWord.length + 1
    }
    
    self.wordRects = rects
}

Once I have the word rects, taps are sent to the selection manager which applies any selection rules. If you tap on the first word and the last word, the app should highlight all the words in the middle for you - this logic and more is all handled in the selection manager.

Finally, the view controller takes the selections and, knowing a bit about the rules for how text can be selected, makes custom CAShapeLayers displayed in the layer behind the UITextView.

highlight process

The separation between what happens in the selection manager and the view controller is at the display level. The selection manager shouldn’t need to know anything about the layout of the screen, just the basic rules for how to select text. The parent view controller can handle both a conversion from taps → word rect hits as well as selected rects → highlight layer locations.

Paying for Open Source

GitHub lunched a new feature yesterday, sponsorship for open source developers.

On its face this seems like a great idea, people who write open source software largely get nothing right now, so more than nothing must be better, right?

But as many folks are right to point out, this is not as simple as it seems. Open source maintainers are already subject to entitled users demanding attention to their pet feature, even if it’s not an explicitly supported use case.

Sponsorship brings a whole new level of “you owe me” to small software that is a dangerous trap to fall into, especially for newer developers. Even without money, writing software can be a trap:

If you’re a young developer writing software for the first time, maintaining and supporting that software feels like your only choice! I spent more time than I’m comfortable with supporting software that I no longer used or cared about because users of that software demanded it, and that’s not how you should treat something that you do for free.

The problem with adding money into the mix is that the guilt of open source is even stronger if you’re taking money from people, and it’s unlikely to make 90% of developers enough money to actually be meaningful.

But I guess the part that bothers me more is that it seems designed around individuals supporting open source developers that write software they use. In reality, most of the monetary value of using open source code is actually gained by startup software companies who make money on services built on top of this free software, not individual developers throwing together a hobby project.

This is a lot more explicit on services like Open Collective where there are already first class user types for companies rather than individuals, and companies that support open source software are promoted in a different way that helps make this practice more widely held and sustainable. Just check out the babel project where you can clearly see support from AirBNB, Adobe, Salesforce and others.


One interesting note that has been overlooked: GitHub’s support for a new FUNDING.yml file which defines a user on various open source funding services. In cocoapods-land, we have a plugin which collects all the licenses from the open source pods you’re using and compiles them automatically into an acknowledgements file for use in your app, so you can properly attribute the open source code you’re using. What if we did that, but for supporting open source code?

In fact, this is exactly the approach suggested by a compelling, if unfinished, project that @aboodman was working on a while back, called dot-donate. Making it easier to support developers would go a long way to making developing open source code a sustainable job, rather than a guilt-driven side project.

This is a treacherous first step for GitHub, I hope they can turn it into something that makes the practice of supporting open source code a startup-driven endeavor, rather than an individual one.

React: Left side of comma operator is unused and has no side effects

The Problem

You tried to expand the content in your component by adding an element before or after an element you were already rendering in this component.

render() {
  return (
    <h1>Your first element</h1>
    <h2>Your second element</h2>
  );
}

The render function of a React component expects a single element to be returned here but you’re passing two, the h1 and h2.

The Solution

If you’re using a modern version of React, you can most likely wrap both of these elements in a Fragment that will virtually group them into a single element for a return, but won’t render any additional content in your HTML.

render() {
  return (
  	<>
      <h1>Your first element</h1>
      <h2>Your second element</h2>
    </>
  );
}

In React versions prior to 16, you can wrap these in an empty div or span which, while it will render in your HTML, most likely won’t produce any additional side effects.

render() {
  return (
  	<div>
      <h1>Your first element</h1>
      <h2>Your second element</h2>
    </div>
  );
}

Or sometimes it’s a good idea to break one of these elements into its own component, further reducing the amount of complexity in a single place.

Another Day, Another Space Mission

Feels like we have another launch or space probe every couple weeks now, yeah?

BepiColumbo is on its way to Mercury after launch last night:

The crazy thing about this mission is the length of time it takes to actually reach Mercury despite the fact that it’s a little more than half the distance to Mars.

Turns out it’s really crazy hard to hit the orbit of a planet that’s so close to the Sun. Without enough energy, you’ll flyby without making orbit and get picked up by the Sun’s intense gravity.

Bepi will spend the next couple years circling the inner solar system to slingshot its way to more and more energy. First Mercury flyby isn’t until 2021 (!) and even then it spends the next four years adjusting itself before finally reaching proper orbit in 2025.

Buying and Forgetting

I have a great way to recommend and read books. It’s called buying and forgetting. It works best if you truly forget what the book is about and start reading it only knowing that it was something you wanted to read in the past.

Today it was Ursula K. Le Guin’s The Lathe of Heaven. I opened the kindle to read something, realized I had finished everything else on my list and then had to find something new.

I think I had flipped through a few Twitter threads back when Ursula died in January, not knowing anything about her work but watching lots of folks make recommendations on their favorite books. I’m not even sure if I read a synopsis or anything back when I decided this was a good place to start. It may have been a case of purely picking the most notable thing from her catalog.

This works best when you impulse buy books you want to read. That way you can flip to the books you don’t have downloaded yet and pick one at random (or, let’s be honest, based on the cover) and start it immediately.


It’s fascinating to know you had an opinion on something previously - “I definitely thought I would like this book” - and you’re trying to figure out what was the hook that got you interested in the first place.

This case was particularly weird because there’s no grand intro to all of the plot points like you can be subjected to sometimes. Here’s the main character, here’s a list of all their features, here’s why this day is going to be interesting.

Instead, I spent the first couple pages really confused as to why I would want to read this book and wondering where things were going. But as the plot started to be revealed and I got more interested in what was happening, it was this pleasant surprise that someone who knows my taste perfectly picked this book out for me, but without spoiling the plot upfront. I did, of course.

There is a willingness to not peek that helps to maintain the fun. Don’t read about the plot on the internet, just trust that you thought it sounded fun before.


I wonder if this sort of situation can be extended to other mediums. Here’s a game I think you’ll really enjoy playing, but you don’t have to read a bunch of reviews on the internet to find it.

And, because I’ve been rewatching Arrested Development episodes at night, I hope I can find a way to recreate the experience it without Forget-me-nows.

Consequence and Risk

I sort of understand the programmer’s attraction to climbing, particularly structured climbing like bouldering. There’s a clear path to progression: you improve and you move to something harder or do something you’ve finished before in less time (sadly, you don’t unlock cheats).

But the extremes of the sport aren’t all that compelling to me. Unlike some people, I don’t post every insane climbing article and video I find.

I somehow found myself reading this New Yorker article about climbing a skyscrapertoday though. And something jumped out at me:

“I differentiate between risk and consequence,” Honnold told me. “Sure, falling from this building is high consequence, but, for me, it’s low risk.” Then he shrugged.

Startups can seem insane to people of certain other professions: why put everything on the line to run a job that will most likely fail? The common refrain in the media is that so-called “serial entrepreneurs” have some sort of unnatural risk-aversion thing turned on in their brain. The truth, I think, is actually much more banal.

For most folks in tech, Startups are actually the opposite of climbing. Incredible risk, but very little consequence. It’s unlikely you’ll actually reach your goal of getting rich or building a large company but if you fail, you have prospects in a ton of other startup jobs all looking to hire someone with your qualifications. The networking opportunities you need to attend to run a startup are practically a low-level job search with successful folks around your area.

This ties back to the idea that the single constistent indicator of startup success is how wealthy your family is.

There are two critical components of that indicator: first, because startups are inherently risky, more people will attempt to build a startup who have something comfortable to fall back on. So, people with plenty of money and/or job prospects.

Second is networks. Networks are significantly more critical to startups than even your idea. Every opportunity to talk about your startup is another dice roll that could give you a great new client, or a new partner organization. Before your natural flow of clients gets you new clients by itself, bootstraping this process is essentially a bunch of random rolls. You can optimize a little bit on how you pitch it, but your primary lever here is making more random rolls or more networking.

Having a well-connected family makes these connections easier. But it can be substituted out with have well-connected friends, or by spending time gaining more personal connections in that area.

Remember when this post was about climbing?

Hour 1 of 10,000

I’ve wanted to play guitar for a long time but it was hard to justify the cost of starting something that I didn’t know if I’d like all that much – really an absurd justification for someone who spends money on stupid technology regularly.

But! A while back I saw the kickstarter for the second generation of loog guitars, smaller form factor guitars with only three strings designed for kids and learning to play. I got one and… it sat in the closet for more than a year.

I finally found the time to pick it up yesterday and start the lessons it comes with in it’s handy app, and it’s incredibly fun. I need to stick with it and remember to pick it up and practice every day but because it’s tiny and requires no real setup, I think it’ll be a good way to take a mid-day break from the computer if I can come up with some basic practice things I can always do from memory.

A couple things I noticed during/after playing last night:

  • I started the whole process after feeling burnt out on a project I was working on for 5 Calls, and afterwards I felt refreshed and ready to work again.
  • I tend to fidget and need some thing to play with in my hands while I’m thinking about something. I felt a few times like I could slip into autopilot practicing something repetitive on the guitar and think about something else - or nothing!

While the loog guitars _are_only 3-strings, they’re the exact same setup as the top three strings of a 6-string guitar so supposedly it’ll be easy to pick up a normal size guitar later on. If my first outing is any indication, I can imaging wanting a regular guitar pretty soon here.

The Same Tune From Twitter

Jack Dorsey (and FB COO Sheryl Sandberg) were asked a few questions today in front of the Senate Intelligence committee, as part of investigations into foreign interferrence ops on social media.

The statement is the typical bullshit we hear from Twitter, and specifically from @jack, all the time:

  • We’re so important to the world
  • We know Twitter has problems
  • Look at everything we’re doing to fix it

Foreign influence ops are not the same problem as the toxic dunk culture that drove me away from Twitter, but this is the same old tune that Twitter execs hum for every problem they have.

Eventually we have to realize that **Twitter doesn’t actually put all that much thought into what’s going wrong with their platform.**They’re stuck on finding ways to deflect from bad attention without displeasing their investors, and so incredibly afraid to change anything on the platform that might anger the cash cow.

write.as

I’m on day 4 of writing on write.as and already feeling that push to avoid breaking my streak. I think that’s what I need to keep moving forward.


It was actually not easy for me to pick a spot to start blogging again. I spent a few days customizing some Ghost blog before I realized I just had to start writing and figure out the customization stuff later. This has always been my weakness.

The minimal choices in Write.as are nice for that. I write about what I’m thinking about today and click the publish button. There isn’t a lot of drafting or picking what to work on. One could customize the CSS but I’m intentionally avoiding it for the moment.

_Maybe_the lack of distribution is helping me write? I don’t feel like I need to filter for x and y since no one reads this (even though someone could).


Write.as so far:

  • Good, minimal interface for writing. No distractions. 
  • Straight markdown is OK, I prefer a really good WYSIWYG editor but those are few and far between.  I used the beta interface for writing in Ghost for a few days too and really liked how easy it was to get WYSIWYG (and embedding!) without a massive toolbar to pick everything.  
  • No embeds, which is shit for when I want to write about a tweet I saw or a youtube video. 
  • Not really easy to upload photos or post from a phone. I don’t do this a lot right now, but would like a place for photos that are less performative than instagram. 

Tomorrow maybe we’ll talk about trackbacks.

Space, and SPACE

Totally unfinished thought about progress and humans and physical space and actual SPACE:

What if cultural resets (the founding of America, an existing country after a revolution, a community after a devastating disease) are critical for the progress of new ideas for humankind?

New foundations are frequently the birth of radical new ideas, often because of some constraint that established communities don’t have. The difference between a community that is happy enough with the status quo and doesn’t want to change, versus one where new cultural norms and ideas of what is valuable are fighting for the top spot.

Perhaps we can make progress in some areas (certain areas of technological change seem to fit well within capitalism), but without any unclaimed land where some malcontents can go start a new colony, are we (humans) limited in how radical new ideas on cultural organization will take root?

It seems like we have a ways to go before we can even start to think about colonizing new plots of land that are not Earth — and let’s be serious, any Mars or Moon colony is not likely to be a self-sustaining community without the support from some gigantic government.

Are we stuck in this particular area until we get off this rock? Or are there cracks where new cultures can still form?

Startup Modes

One of those things that you have to do a lot of as a small startup is switching between planning and execution modes… sometimes too quickly.


Recently we started working on advocacy tools that 5 Calls could provide to other groups, giving them the same sort of mobilization that we are able to generate for our own topics.

As we’re making this switch over from campaign tools to advocacy tools and thinking about what is compelling for other orgs, there’s a lot of planning for what a product actually looks like (and that’s different from what we actually use for the 5calls.org issues, for a few reasons) and because we’re later to the game than I would have liked, we need to figure that shit out relatively quickly.

So a lot of thinking goes into what the product is, and I try to organize as best I can into what is MVP-worthy versus what is something we can build down the line.

The weird part is that we found someone to pilot this new product with very fast, almost before I was even sufficiently happy with the definition for what it was going to be, so swapping over to build, build, build mode was sudden.

Now that the MVP is done, I realize how much I forget about the planning part when I’m busy putting all the pieces together. It’s time to revisit the plans and see what we did and what might be next.


Perhaps some one with more discipline can do both modes at the same time. I find switching between the two very taxing, so I do as much of one as I can before I need to switch to another to move the product forward.

I imagine this is easier with a dedicated product side and engineering side! Hopefully in the future we’ll have that luxury, but for now I have to make sure I’m covering both with some regularity.

Tesla's Tech Debt

Fascinating account of what it looks like on the backend of Tesla’s software stack.

I can’t imagine they’ve fixed many of this situations considering the incredible crunch to get the Model 3 out the door over the last year. That means they’re well overdue for something to break in a bad way.

One comment stands out above the rest: They’ve forgotten about the part of “move fast and break things” where you figure out what worked and do it right.

Single Player Nostalgia for Goldeneye on N64

This oral history of Goldeneye for N64 is really excellent if you’re a fan of the original.

Multiplayer is what most Goldeneye fans remember when they think about what stuck them to the game for such a long time, but for me it was all the little challenges that added replayability to every level along the way.

Here’s one of the ways to unlock cheats in the game:

Clark: Finishing the level faster than the target time unlocked a cheat. The harder the target time, the more awesome the cheat mode: Turbo mode, Bond invisible, invincibility, unlimited ammo — essentially keys to enter God Mode, a means to explore the game in unimaginable ways. Personally, the challenge itself got me addicted: It was a very dynamic game for speedrunning, and the target times were a clear invitation to prove yourself. Facility 00 Agent’s target of 2:05 was the legendary measuring stick.

“Cheats” were something you couldn’t use to actually make progress in the game, but they were both a point of pride – you beat the level under this very short time! – and a way to have fun or add extra challenge around levels you’d already played a hundred times before.

My memories of the game are mostly around being able to get this extra fun or unique content from a game that doesn’t take all that long to beat the first time around. Though to be perfectly honest, it was more difficult than most especially when it came to finding objectives on what was then a set of very large maps. Nowadays, games with objectives that you have to find are usually circled on a map or have an arrow pointing at them (get off my lawn, I guess).

This sort of difficulty only appeals to a certain type of person, of course, but as a teenager with far too much time on my hands when I picked up Goldeneye, I definitely fit the mold perfectly.

Migrating from Swift 2 to Swift 3, Part 1

As we approach the release of Xcode 8 and Swift 3, we face the inevitable task of upgrading our old Swift 2.x code to the new syntax in Swift 3, including the major reworking of Foundation and UIKit names that has become known as the Grand Renaming.

If you’ve been through a major Swift version change before, you know the drill: Xcode will offer to convert your source automatically to the new syntax which will usually get you 80% of the way to building successfully. The last 20% is made up of usage that Xcode couldn’t determine the correct fix for. It’s up to you to fix these items manually before your project will build again.

And yes, for the moment you can stick with Swift 2.3 in Xcode 8

First off, the automatic conversion by Xcode is a great place to start. It’ll handle most of the easy changes for you. You should, of course, review these changes to see what’s being changed an ensure none of the underlying logic is modified. But you should also want to know the state of your code!

Here are some common types of automatic conversions that Xcode will provide for you:

Underscores in method signatures

The biggest change you’ll probably see in your code is lots of method signatures gaining _ as their first external parameter. This is to counter the new syntax that requires using the first parameter name by default when calling a method. Rather than changing all your method calls, it’s easier for Xcode to behave as it did in Swift 2.x and keep those calls the same.

However, the thinking behind using the first parameter name is sound! You’ll still want to make those changes so you have first argument names, but that’s a change that can be done during your manual conversion phase or in a post-conversion cleanup.

Private becomes fileprivate

All your declarations that were formerly private will now be fileprivate which is the new keyword that behaves exactly as private did previously, restricting access to the current file. The new private allows access only within the current declaration, restricting access even further than before.

In many cases where you’re simply being safe by restricting access to an API, you can change this back to private as it was before without an issue. However, if you’re an avid extension user you might want to stick with fileprivate as these properties won’t be visible to extensions in the current file with private.

Grand Transition Renaming

There are a lot of items that fall into this bucket and are renamed automatically for you, here’s some common ones that you’ll likely run into:

The NS (NextStep!) prefix has been removed from the vast majority of APIs and many singleton-like patterns (sharedX, defaultY, etc) are no longer methods but properties. In addition, what used to be sharedManager or sharedApplication is now just shared.

  • NSNotificationCenter.defaultCenter() is now NotificationCenter.default with additional renaming such as postNotificationName -> post
  • Names for notifications are no longer strings but enums of the type Notification.Name
  • NSBundle.mainBundle().pathForResource is now Bundle.main.path 🌟
  • .respondsToSelector() is now .responds(to: #selector())
  • componentsSeparatedByString(".") is now components(separatedBy: ".")
  • NSUserDefaults.standardUserDefaults() is now UserDefaults.standard with additional renaming such as objectForKey() -> object(forKey:)
  • NSProcessInfo.processInfo is now ProcessInfo.processInfo
  • enumerate() on arrays and dictionaries is now enumerated()
  • NSFileManager.defaultManager() is now FileManager.default
  • NSDate is now just Date! 🌟
  • NSDateFormatter is now just DateFormatter
  • NSUTF8StringEncoding is now much more reasonably named with String.Encoding.utf8
  • dispatch_queue_create and similar have been drastically simplified to names such as DispatchQueue 🌟

One note from an item that was not converted: Your Swift strings are still String and their Objective-C counterparts are still NSString because they’re distinct and removing the NS prefix would obviously cause some weird collisions.

Maybe you’ve been feeling the unswifty-ness of those old Objective-C naming conventions and using some better ones already. If not, now is a great time to get a handle on the better naming conventions for Swift and starting to adopt them in your code.

In addition to the naming conventions, many of these types get proper mutability handling when using let and var like you would see in a native Swift struct.

Multiple unwrapping conditionals

Previously you could trim additional lets from the inside of conditional unwraps but this is no longer the case:

// this won't work in Swift 3
if let x = optionallyGetX(), y = optionallyGetY() { ... }

// much better
`if let x = optionallyGetX(), let y = optionallyGetY() { ... }`

The additional lets and vars must now be in place!

Conditions no longer contain where

Earlier syntax would let you insert where into conditionals, making your if let statements feel a bit more like natural English. No longer is this the case, they’ve been replaced with a simple comma 😢

// previously
if let x = optionallyGetX() where x == true

// now, just commas
if let x = optionallyGetX(), x == true

These are just some of the big items you’ll run into when looking at your diffs after running the Xcode automatic migration. But even that probably won’t get you to a buildable state. Next, we’ll investigate the manual changes you might need to make before your app is completely converted to Swift 3.

Using Swift 2.3 in Xcode 8

We’re well into the betas of Xcode 8 which will contain the final release of Swift 3, hopefully set for release around the first couple weeks of September. With this next release of Xcode, we’re encouraged to update our Swift syntax to Swift 3 from 2.2 but - and this is unique to this major Xcode release so far - we’re not quite required to do so.

There’s a single build setting that will let you continue building your Swift projects with a Swift version that’s mostly similar in syntax to your existing projects from Xcode 7: Use Legacy Swift Language Version

Just drop into your project’s build settings and search for legacy swift to find the correct build setting, then switch the setting to YES to opt-in to Swift 2.3 rather than Swift 3 in Xcode 8.

Use Legacy Swift Language Version in Xcode 8

Swift 2.3

The primary changes in Swift 2.3 should end up being minor items such as nullability changes in core Objective-C libraries which will make moving your code from Xcode 7.3 to 8 pretty easy.

You’ll be able to get the benefits in Xcode 8 without having to move to Swift 3. These are improvements such as the Memory Debugger, Editor Extensions and my personal favorite: less unintentional changes to xib and Storyboard files!

Speeding Up Slow Swift Build Times

A quick note today: People seemed interested at the ease in which we can currently make the Swift 2.2 compiler take 12+ hours to compile some basic code because of type inference. From this post by Matt Nedrich, we can see a simple example of code taking way too long to figure out what types should be used.

let myCompany = [
   "employees": [
        "employee 1": ["attribute": "value"],
        "employee 2": ["attribute": "value"],
        "employee 3": ["attribute": "value"],
        "employee 4": ["attribute": "value"],
        "employee 5": ["attribute": "value"],
        "employee 6": ["attribute": "value"],
        "employee 7": ["attribute": "value"],
        "employee 8": ["attribute": "value"],
        "employee 9": ["attribute": "value"],
        "employee 10": ["attribute": "value"],
        "employee 11": ["attribute": "value"],
        "employee 12": ["attribute": "value"],
        "employee 13": ["attribute": "value"],
        "employee 14": ["attribute": "value"],
        "employee 15": ["attribute": "value"],
        "employee 16": ["attribute": "value"],
        "employee 17": ["attribute": "value"],
        "employee 18": ["attribute": "value"],
        "employee 19": ["attribute": "value"],
        "employee 20": ["attribute": "value"],
    ]
]

Build and run any files with this and Swift will get stuck on compilation for at least 12 hours (from Matt’s experiments). He notes that less employees take significantly less time to compile (though still way more than you’d expect). Seven employees takes my Mid-2011 iMac (3.4Ghz i7) about 630ms to compile. That might not sound like a lot by itself but it’s a lot more realistic: the danger is spreading little increases in compile time all over your Swift code, leading to overall wait times for each build measured in tens of minutes.

This is a type inference problem. The Swift compiler doesn’t know what type is coming next so it has to investigate and find out before it can continue compilation. This case is a particular “quirk” where adding more data increases compile time exponentially but fundamentally Swift is doing The Right Thing: checking which type it thinks you mean.

One of my favorite features of Swift is type inference so I’m not going to just stop using it because it can cause build time increases. Instead, we should focus on identifying problem areas (sometimes in unexpected places!) and helping the Swift compiler determine the correct type in the short term. The long term solution rests on the Swift compiler team 😅

If you suspect that something is taking too long to compile in your Swift project, you should turn on the debug-time-function-bodies option for the compiler. In your project in Xcode, go to Build Settings and set Other Swift Flags to -Xfrontend -debug-time-function-bodies.

Set debug-time-function-bodies for the Swift compiler

Now that Swift is recording the time taken to compile each function, build your project again with ⌘-B and jump over to the Build Report navigator with ⌘-8 where you’ll see the most recent build (and possibly some others).

Navigate to the build report with ⌘-8

Next, right-click on the build log for the target you built and select Expand All Transcripts to show the detailed build log.

Expand All Transcripts to see the detailed build log

Finally, you should see a series of green boxes, each representing a file or step in the compilation process. The text inside these boxes may take a moment (or a click) to load properly. If you correctly set up the build flags to show function compilation times, you should see a line of build times along the left. Scan these lines for anything that looks suspect! Anything longer than a hundred milliseconds should be investigated.

Spot long compile times along the left side of the build log

We can see our 630ms+ compile time in viewDidLoad where we were testing the type inference earlier. 630ms for just a few lines of code!

Now that we know type inference can be a problem here, we can investigate the problem areas, specify type information and try building again. In this case, simply defining the structure to be a Dictionary<String, AnyObject> brings our compile time for that function down to 21.6ms. Even adding the rest of the employee objects back in doesn’t meaningfully change the compile time. Problem solved! Hit the rest of the potential problem areas in your code and try adding type information to speed up the compile times for the rest of your project.

let myCompany: Dictionary<String, AnyObject> = [
    "employees": [
        "employee 1": ["attribute": "value"],
        "employee 2": ["attribute": "value"],
        "employee 3": ["attribute": "value"],
        "employee 4": ["attribute": "value"],
        "employee 5": ["attribute": "value"],
        "employee 6": ["attribute": "value"],
        "employee 7": ["attribute": "value"]
    ]
]

Two updates since just yesterday: the bug in question has been fixed for the next swift release (3?). This shouldn’t be read as “all type inference issues have been fixed”, but the problem that was causing this one to grow exponentially was fixed. I should also suggest that if you run into something similar (find them with the method mentioned above!), file a bug at bugs.swift.org and it will get fixed!

Secondly, Erik Aderstedt mentioned a great way to automatically sort your function timing results so you can find the biggest slowdowns:

Upgrade your TableViews with Loading State

@Javi briefly mentioned the Fabric approach to dealing with table views at the Swift user group meetup the other night, opting for an enum that represented the state of the table as loading, failed or loaded with an associated type (the data for the table view). Here’s a simple example:

enum TableState {
    case Loading
    case Failed
    case Items([String])
}

If you’re just using an array (or optional array) for your table data, there’s only so much you can say about the state of the operation that’s supposed to be gathering and inserting data for your table views. I will admit to tracking this sort of thing as a Bool property on the view controller - hasLoadedData or something - but that’s messy and it’s not immediately obvious what data loading operation you’re tracking.

It would be nice to be able to infer the state of a table from the data structure alone. Previously we might have written table view code that pulled data from an optional array, letting the .None state indicate that the data hasn’t loaded yet and any .Some state (even with an empty array) means the data has been loaded.

But there’s more than just a loading and loaded state on most asynchronously loaded table views. Usually we’ll want to track if the data has failed to load for some reason (no network connection, server error codes, etc) and display some useful message in that case so the user isn’t waiting for something to happen. Now we’ve added a third state and maybe a loadedDataError optional to our view controller and that’s starting to make your view controller sad 😢

Simplify with Enums and Protocols

The enum above goes a long way towards making our view controller more readable and representing the state of our table view data. But we end up with a lot of switches in our code which is messy. There are proponents of the idea that enum switches should never exist outside of the enum definition (I’m not 100% on board with this idea but at least in this case it makes our code more readable). So let’s extend our enum a bit:

enum TableStateString {
    case Loading
    case Failed
    case Items([String])

    var count: Int {
        switch self {
        case let .Items(items):
            return items.count
        default:
            return 1
        }
    }

    func value(row: Int) -> String {
        switch self {
        case .Loading:
            return "Loading..."
        case .Failed:
            return "Failed"
        case let .Items(items):
            let item = items[row]
            return item
        }
    }
}

We’ve added a computed property to get the number of rows to show and a method to return the value for a particular row.

Now we can use this in our view controller as follows. Note our addition of table view reloading when the data changes by reacting to the new value in didSet!

class TableStateViewController: UIViewController {
    var tableState = TableStateString.Loading {
        didSet {
            self.tableView.reloadData()
        }
    }
    
    func loadItems() {
        tableState = .Failed
        // or
        tableState = .Items(["One","Two","Three","Four","Five"])
    }
    
    func tableView(tableView: UITableView, numberOfRowsInSection section: Int) -> Int {
        return tableState.count
    }

    func tableView(tableView: UITableView, cellForRowAtIndexPath indexPath: NSIndexPath) -> UITableViewCell {
        let cell = tableView.dequeueReusableCellWithIdentifier("cell", forIndexPath: indexPath)

        let value = tableState.value(indexPath.row)
        cell.textLabel?.text = value

        return cell
     }
}

In this simple example we just display the value in a single table view cell if the result is Failed or Loading but there are more visually pleasing options such as DZNEmptyDataSet which you can display when receiving either of those states as well.

Of course we’re just using a simple String type as our table view data here, we’re inserting a standard table cell and setting the text label from our list of strings. This is straightforward to write for the String type alone if you’d like to generate a StringTableState for some specific part of your app that only needs strings. But plenty of table views get their data from structs or classes and we usually have many different tables with many different data types in a single app.

Luckily, this is Swift and there’s a lot we can do with generics to provide a TableState that works for all sorts of types. Here’s a more general implementation of TableState that works for all types, provided your type conforms to the simple TableValuable (ugh, better name suggestions?) protocol.

protocol TableValuable {
    associatedtype TableItem
    static func loadingValue() -> TableItem
    static func failedValue() -> TableItem
    func value() -> TableItem
}

enum TableState<T: TableValuable> {
    case Loading
    case Failed
    case Items([T])

    var count: Int {
        switch self {
        case let .Items(items):
            return items.count
        default:
            return 1
        }
    }

    func value(row: Int) -> T.TableItem {
        switch self {
        case .Loading:
            return T.loadingValue()
        case .Failed:
            return T.failedValue()
        case let .Items(items):
            let item = items[row]
            return item.value()
        }
    }
}

// and implementing TableValuable on String

extension String: TableValuable {
    typealias TableItem = String

    static func failedValue() -> TableItem {
        return "Failed..."
    }

    static func loadingValue() -> TableItem {
        return "Loading..."
    }

    func value() -> TableItem {
        return self
    }
}

It’s an interesting exercise in using associated types in protocols and enums if you haven’t got your feet wet with those yet. One line of note is the call to get the associated type from an enum case: case let .Items(items): which is incredibly addictive once you start using associated types. I’ve never seen this sort of object attachment on enums in another language and yet once the idea gets in your head, you realize the myriad use cases for it.

Extra tips

Perhaps the best part about this code is that it’s just over 30 lines of comprehensible Swift. If you’ve got a case where there are more states than just Loading, Failed and Loaded in some particular part of your app, it’s straightforward to modify a few places to be more appropriate for your use case. It’s definitely more of a micro-framework than an actual framework, I’m even hesitant to provide a CocoaPods / Carthage compatible project for it instead of just the gist.

My favorite part of this mechanism is how it encourages you to break what is usually a large table view data source into smaller components. Rather than configuring a table cell in cellForRowAtIndexPath, you now have an extension on your list object (String or otherwise) that is ripe for setting your cell configuration or at least returning the data relevant to that cell.

You might already have a protocol that all your table view data types conform to - TableCellConfigurable perhaps - and it’s trivial to require your state data source to be both TableValuable and TableCellConfigurable. Again, protocol oriented programming in Swift really shines.


We only have an associated type on the .Items case in the enum but if you’ve got an ErrorType for everything that goes wrong in your application, you can also set an associated type on the .Failed enum case to your error type and further track the cause of errors, perhaps to customize the failure message in your app. Customize the value(row: Int) -> T.TableItem method to return either a specially crafted row data type or you can implement a error() -> ErrorType? method if you want to return your raw errors as a separate type from your data type.

Widgets get an upgrade with the new macOS

This is a little different than the creative code exercises we usually do here at That Thing in Swift, but here goes:


All this talk about macOS had me thinking about what we’ll see at WWDC this year and when I read Brent’s reminder about the ever-present threat of bringing UIKit to the Mac, these ideas started to click together in unexpected ways.

Brent and I have some different opinions on how UIKit could be brought to the Mac. His vision is a bit more vanilla: shoehorn menus and AppleScript and everything else into UIKit for OS X because it might bring some new developers from iOS to the Mac. Mine is a bit more of a shakeup - obviously not an unheard of move for Apple - and it also resolves the “boring” parts that Brent brings up about Mac development.

First, some backstory: UIKit is the framework that we use on iOS to develop UI concepts that feel at home on the iPhone and iPad. You can make an entirely custom UI if you want (think full screen games made in Unity) but as soon as you need to accept user input or pick a photo from the library, you need to talk to UIKit. AppKit is the predecessor to UIKit that lives on the Mac. AppKit is significantly different (menu bars! keyboard shortcuts!) and has much more flexibility because of the platform it lives on. Developers have long expected the unification of AppKit and UIKit but we haven’t heard an official Peep about it yet.

Convergence in Simplicity and Design

OS X has always danced around a simpler form of desktop applications. Dashboard/Konfabulator and Today View widgets were made with the idea that there are some apps that just don’t need a full desktop app experience to be useful. You can almost think of dashboard widgets as the original iPhone apps: no file pickers, no menus, they just do one thing really well. They’ve never been very popular on the desktop but they’ve also been hamstrung by second-class treatment: Dashboard widgets were written in javascript with mediocre OS integration and the Today View is both visually and functionally inflexible. It feels like there’s some space between shitty display-only widgets and full-on desktop apps that hasn’t been explored on the Mac.

If we consider this first approach too simple, Apple has been working this problem from the opposite side as well: making iOS apps that are more complex. Apple really pioneered the idea of non-bite-sized content creation of the iPhone and iPad with Pages, Keynote, iMovie, etc. These apps really push the boundaries of what an app is expected to do and how much real work you can get done on an iPad. Though Apple certainly doesn’t own all the best productivity apps in the iOS platform, Multitasking and Smart Keyboards prove they’re 100% behind the idea that the iPad is a productivity device.

These two approaches haven’t been given equivalent effort up until now. The iPad has made far more progress towards productivity than the Mac has made towards simplicity but if you look in the distance, you can start to see the convergence of the two approaches.

The macOS we’ll see at WWDC

Let’s paint a picture of what you’ll see at WWDC, starting with a desktop Mac with a screen that looks like multitasking on the iPad. You can do this today with El Capitan’s split view but it feels weird with apps that do custom things with the title bar (I’m looking at you Chrome) and it feels way better on a iPad than it ever does (even with the stock apps) on a Mac. Your apps are always full screen and can be split if you want more apps on the same screen. macOS will introduce more flexible window splitting that lets you create different configurations of apps and windows that are particularly well-suited to your task (Sherlocking Moom and a bunch of other useful tools). Perhaps this is managed by something that resembles the Editor > Open in... dialog in Xcode.

Using this dialog, you can split your view in multiple places as well as add new tabs

If you’re working on web development, you can split your screen to include Safari and a short terminal window on the left, with a large HTML editor (Atom, perhaps?) on the right. These configurations are easily saved and recalled, launching any apps needed to fill in your window configuration. Congrats, Apple just killed the concept of launching and quitting apps on the desktop, something it’s been itching to bring over from iOS for ages. If you want to see a preview of what this looks like, restart your mac with a bunch of windows open. Disabled previews of what the windows last looked like will appear before the app finishes launching. Naturally, everyone will complain that Apple stole window splitting from Emacs. Apple, as usual, put a real slick coat of paint on something that already existed and gave it a marketing name (though that name might not be Split View).

By extending the existing Split View mechanism to many splits, productive configurations can be built from many 'full screen' apps

I’ve been waiting for this next part for years: There’s no desktop showing through the cracks because there is no desktop. Your files are saved and sorted into an iCloud-like system where searching rules and navigating folders is a thing of the past. The apps that run in this new macOS are written exclusively for the new UIKit framework and can’t be run outside of it like a current OS X desktop app.

For the moment the Finder is still switchable in the background because there are no macOS apps yet (other than the stock apps launching with the beta release), but I’m not so sure about the future of a Finder-based OS X. Apple is never hesitant to divide a platform into those that update regularly and those that fall behind and this is another one of those times for developers. The last time we saw this on the Mac was the 64-bit transition (2012?) and before that, the PowerPC transition (announced 2006, removed support in 2009). iOS sees these sorts of transitions far more often with screen sizes and support for newer specialized hardware but it seems well within Apple’s interest to extend this paradigm to new macOS apps if they can.

To be very clear, macOS apps aren’t dumb like dashboard widgets, think of them as bigger, better versions of productivity apps on the iPad. They simply lose the extraneous stuff that has driven people towards post-PC devices in the last few years. Refining the experience down to the essentials has long been the core of the Apple experience and the one that serves their customers best. These new apps refine the idea of a desktop app down to the basics, giving it an iOS-y simplicity without losing productivty. AppKit developers will be encouraged to rewrite their apps for the new UIKit (which will really thrill Brent and other AppKit developers), iOS developers are encouraged to bring all their iOS apps onto macOS, and new macOS apps will only be available via the Mac App Store.

I was originally trying to make this point in under 140 characters on Twitter but it ballooned into this post. The idea isn’t to dumb down the Mac experience, it’s to bring the simplicity and familiarity of iOS apps to the Mac.

What this means for the Developer

The new macOS is announced at WWDC for a reason: developers are the only way this transition can work. New macOS apps are written using the new unified UIKit framework and Apple wants the legions of iOS developers they’ve created to start putting their content on the Mac. For all the reasons Brent mentioned above, AppKit development is perceived as harder than UIKit development and the giant box of unknowns keeps people away from developing for the Mac. Sharing lots of code between your iOS app and its macOS counterpart is going to make that significantly easier, and you’ll be able to deploy to watchOS, iOS, tvOS and macOS with a (greatly) unified framework.

For some of the most up-to-date iOS apps (notably the ones that are designed for iPad screen sizes and multitasking), your app already works on macOS. Hopefully you enabled bitcode on your latest project because the Mac isn’t going all-ARM quite yet. For most people, the name of the game to get your app on macOS is Size Classes and you’re going to want to support a bunch of them if you want to be resizable in the many different orientations that your app can be displayed in the new macOS split views. With this comes significantly better support for previewing and modifying autolayout constraints for size classes in Xcode.

Swift is obviously the language of choice when it comes to this transition, but Objective-C isn’t going away anytime soon and you can continue to create new projects in Objective-C or use it in parts of your mainly-Swift app. UIKit unification isn’t exactly news to the Swift team, they’ve been planning for it:

  • swift 2’s @available lets us develop classes that work across iOS and macOS, resolving minor differences between the OSes with built-in OS checking
  • As mentioned above, size classes are a huge benefit to those working across devices. They’re minimally helpful for iPhones alone but they begin to show strength for multitasking on the iPad. They’ll really shine across shared iPhone, iPad and macOS layouts
  • UITraitCollection is a UIKit class that gives more information about supported sizes and capabilities for the devices we’re running on, including force touch support, now on the Mac as well

And the best part about the developer announcements? The new macOS comes with unified Xcode for iPad and macOS. It’s Apple’s way of saying that this new macOS paradigm isn’t just for simple widget-style apps from iOS, we’re going to create something that actually helps you get work done and feels faster than your current workflow.

A History of Widgetization

Apple is rarely the first company to try out new interface concepts and a widgitized post-filesystem desktop isn’t particularly novel for operating systems. The most obvious example is probably Window’s brief foray into a widget-heavy start screen with the Windows 8 Metro UI. This approach was too far on the widget side of the spectrum, optimizing for bite-size information which doesn’t fit very well with the goals of a desktop user (and part of why the Windows Phone UI stuck with the concept).

Windows 8 'Metro' start screen with widgets galore

Even Google ChromeOS can be thought of as a transition to a different kind of operating system. An icon-less desktop with a very fuzzy concept of the filesystem and essentially a single app to run. Why they still let you resize and drag windows around is beyond me, it seems almost entirely useless on the device where a decent split view manager could simplify the whole experience. The distinction here is that Chrome is the one “widget” that you get and you can fill it with anything from the web. Notably different from Windows 8, people (OK, school districts) actually seem to like ChromeOS because they’re cheap and to most people the internet is really just the web.

It’s not a stretch to predict that people won’t be happy with the new macOS at first, the least of them developers with set-in-stone workflows, which is typical of users when presented with something new. But I think the core concepts actually have the ability to be better than what we have now (we really haven’t come up with something better than the menu bar?) and it’s possible that Apple is the only company that has the experience in building a framework for radically simpler apps that maintain user productivity.

Final Thoughts

Why do I think we’ll see a version of macOS and UIKit at WWDC this year? No inside sources here but we’re overdue for a few things that could point to something new coming.

  • UIKit isn’t on the Mac. Perhaps the best argument that UIKit isn’t going to be used to develop standard OS X apps is that it hasn’t happened yet, there’s some deeper thought going on about how it should be done
  • iTunes isn’t getting a redesign because it’s being redesigned as the macOS Music and iTunes Store apps, similar to iOS

This is Apple so it’s always hard to say if something is being planned for tomorrow or in four years but the hype is building for WWDC this year and yet another “quality focused” release of OS X would be mighty boring.

Andrew Ambrosino has written the next best thing about macOS speculation, his ideas on convergence of the two platforms and leaving the old navigable filesystem behind are spot on. I don’t think he’s put a lot of thought into UIKit on the Mac though; the AppKit vs UIKit label isn’t what’s keeping Google Inbox and Netflix from creating native apps for the Mac, it’s the fact that you have to rethink the whole app to adhere to menu bars and keyboard shortcut conventions on a different platform. Taking an iOS-based approach to macOS apps means you have to add a few features to fit in, not rethink the whole structure. Pretty mockups though. Remove the window controls and go full screen and that’s about the same thing I expect.

Faux Dependency Injection for Storyboards

I do a lot of work where I have to set up views and view controllers for a large number of screens and I have to admit that I enjoy using Storyboards for most of it. I know it’s a polarizing subject with iOS developers and there are lots of specific instances where Storyboards don’t work or work poorly, but for the most part my process for using Storyboards is hassle-free. I attribute a large part of this to doing as much layout as possible in Storyboards and keeping configuration in code, either as initialization closures or in object subclasses.

However, my biggest issue with Storyboards is lack of dependency injection. If you’re developing views entirely in code, you can customize your initialization methods to take required (or optional) parameters that influence the loading and display of your view controller.

Consider a profile screen that shows the current user’s profile picture, username, email, etc. We could load our current user from our session singleton and configure the views in viewDidLoad and immediately configure our views with the user’s data. But if we want to share this screen for displaying profiles of other users, we have to do some extra work by implementing some session singleton method for getting the data for the other users. That doesn’t feel nice, and definitely not very Swifty.

Instead, it’d be better to pass the user object that we want to display into our profile view controller on initialization and then be able to use that data in viewDidLoad to set the detailed data in our views. If you’re building your app entirely in code, this is straightforward to accomplish because you can create the initialization method for your view controller and use that specific method when you want to push your profile onto the screen:

class ProfileViewController: UIViewController {
    var profileUser: User

    init(user: User) {
        profileUser = user

        super.init(nibName: nil, bundle: nil)
    }
    
    required init?(coder aDecoder: NSCoder) {
        fatalError("init(coder:) has not been implemented")
    }
}

class MainViewController: UIViewController {
    @IBAction func profile() {
        let currentUser = User(name: "Nick", userpicURL: NSURL(string: "https://thatthinginswift.com/profile.png"))

        let profile = ProfileViewController(user: currentUser)
        navigationController?.pushViewController(profile, animated: true)
    }
}

We don’t control the call to ProfileViewController’s init method (initWithCoder, actually) when using a Storyboard so we’re out of luck there. I’ve been using the prepareForSegue method to add any data that the upcoming view controller needs which does the job, albeit with too much boilerplate code for my liking. There’s a good rundown of this method at Natasha the Robot last week, here’s the short example:

override func prepareForSegue(segue: UIStoryboardSegue, sender: AnyObject?) {
    if segue.identifier == "profile" {
        let currentUser = User(name: "Nick", userpicURL: NSURL(string: "https://thatthinginswift.com/profile.png"))

        let dest = segue.destinationViewController as! ProfileViewController
        dest.profileUser = currentUser
    }
}

prepareForSegue is really the only option for setting these values before the new view controller takes over, so any workaround we’re going to make is going to revolve around prepareForSegue. Luckily it occurs before viewDidLoad for the new view controller and viewDidLoad is typically the first time you take control in a view controller so (for the most part) you can behave as though profileUser always existed since initialization.


The first solution I came up with is a UIViewController subclass I call PreparedViewController and it overrides prepareForSegue, reflects on the properties of the current view controller and the segue destination controller and automatically copies values that have a given prefix. It’s tiny, so we can just show the code and usage:

class PreparedViewController: UIViewController {
    override func prepareForSegue(segue: UIStoryboardSegue, sender: AnyObject?) {
        let dest = segue.destinationViewController

        // get any destination properties with our prefix
        let prepProps = Mirror(reflecting: dest).children.filter { ($0.label ?? "").hasPrefix("prepCtx") }
        for prop in prepProps {
            // check for a property on the current view controller with the same name
            let selfProps = Mirror(reflecting: self).children.filter { ($0.label ?? "") == prop.label }
            // unwrap everything and set via KVC
            if let sameProp = selfProps.first, childObject = sameProp.value as? AnyObject, label = prop.label {
                dest.setValue(childObject, forKey: label)
            }
        }
    }
}

class ViewController: PreparedViewController {
    let prepCtxFloat = 40.5
    let regularFloat = 20.1
}

// segue between ViewController and SecondViewController set in Storyboard

class SecondViewController: UIViewController {
    var prepCtxFloat: Float = 0
    var regularFloat: Float?

    override func viewDidLoad() {
        // prepCtxFloat is now 40.5
    }
}

In this case, SecondViewController’s prepCtxFloat will be set to 40.5 automatically during the segue because the property names match, regularFloat won’t move between ViewController and SecondViewController because it doesn’t have the required prepCtx prefix.

This approach uses key value coding to accomplish the assignment which isn’t exactly a problem - UIViewController is an NSObject subclass anyway - but it’s brittle if the types don’t match. You could add some more strict type checking to prevent crashes, that’s information that Mirror will provide, but there’s no way to get compile-time information about which transitions will work.

The other gotcha is that the receiving view controller’s properties must be var and must have an initial value (i.e. they can’t be optional because that’s not compatible with Objective-C and thus KVC, you’ll get a this class is not key value coding-compliant error if you try this with an optional). Maybe not a big deal for simple values, but you’ll soon dread creating large dummy objects to be held only until prepareForSegue replaces them. Default values in a world where optionals are the real solution also rub me the wrong way.

The second solution I came up with is almost not worth mentioning: a protocol that requires a common segueContext dictionary in each view controller and syncs them during prepareForSegue. The protocol-ness means you’d still have to call syncContext or something during segue. And I’m not sure I want to go back to a world where I have to remember which type is which when unwrapping all these magic strings from a dictionary. All the complexity of a JSON parser but available to you whenever you perform a segue!


This is the second time I’ve run into an implementation that could have been greatly improved by something like native Swift KVC support. It’s a bit unfortunate - but understandable - that something KVC-like has been pushed to post-3.0 work, we’ll just have to wait a bit longer before these kinds of tools can be seamless.

March was for Swift

April is here. I’ve got to admit that I haven’t been super productive on the side projects in the last couple weeks. My parents were in town at the end of March, a few new proper work projects have sprung up and I’ve been spending a few free hours here and there playing Fallout 4. Other than some tinkering with Swift, there’s not much progress on the active projects.

I do have a few things that I would like to finish in the next two months though. The first three weeks of June are going to be very busy so I’d like to finish up a few things before then so I don’t have to take a three week break and come back to a project I don’t remember anything about. Maybe Deep Birding ?

I’ve been having a hard time getting started on machine learning stuff. There are plenty of tools but they’ve all heavily optimized for seeing the quantitative efficiency of the results for testing and research, not for visualizing or adapting the results for use in a project. I have to do a lot more reading before I can get up and running with it.


As for current projects, That Thing in Swift continues to have its best-month-ever every month. I wrote about some clever ways to adjust the organization of view controllers in Kill your viewDidLoad on the 16th of March and finally posted to Reddit on the 21st which sent huge amounts of traffic and links from various other places. The long tail of Twitter links continues into this week. I finished the custom page preview images the week after that post launched so now all those links have nice images.

It remains to be seen if the many links given in the last couple weeks translate to more search traffic (by far the dominant means to reach the site). I don’t know how long that might take or when those values are recalculated or even what search terms it might impact.

I killed the discourse integration and server. That was not a good substitute for comments. I’m not certain a normal comment system would be useful or drive any sort of additional traffic. I was thinking about in-page annotations/comments but I don’t like the options that I looked at. I would have to build my own to make it really fit with the content and that seems like a lot of effort for little benefit.

Syntax Highlighted Image Previews for Hugo

On today’s episode of Various Tools Connected Together In a Way That May Only Be Useful For Me, I’ll discuss some customization I recently did for That Thing in Swift to get syntax highlighted images for image previews on Facebook, Twitter and Google.

I love writing new stuff for That Thing in Swift , especially now that I’ve found a niche in what to write about and I’m continually surprised at the amount of traffic that organic search and social shares can bring to the site for a given article. I’ve been working on some SEO goals (in a good way) and one thing I noticed that other Swift resources do not do is providing a helpful preview image for search results and social unfurls.

It would be easy to make something generic for the site that shows up for every post. That would be semi-helpful for social shares but not so much for search results. Instead, what if we could show people exactly what they came to the site to find in the first place? What if we could show preview images of the code we’re about to demo?

My goal was to create short snippets of syntax highlighted code that were representative of the post content

Kill Your Giant viewDidLoad

Back in Objective-C, we prepared all of our view controller properties in viewDidLoad because that was our only option unless we wanted to subclass every element to provide custom initializers. Using some tricks in Swift, we can provide clear, readable initalization outside of viewDidLoad that makes our code easier to read and reason about.

The old, bad way

Here’s a traditional viewDidLoad that I would have written when starting in a new view controller in Swift after working in Objective-C for years previously:

class ViewController: UIViewController {
    let topView = UIView()

    override func viewDidLoad() {
        topView.frame = CGRect(0, 0, 100, 200)
        topView.backgroundColor = UIColor.redColor()
        view.addSubview(topView)
    }
}

We initialize our topView as a property because we want to have access to it elsewhere for animation, etc. Once the view is loaded, we configure the parts of our view that we want to modify before placing it as a subview. This is straightforward to look at for a single view (albeit a bit disconnected) but you can see how this can quickly get cluttered as more and more views are configured and added during viewDidLoad.

class ViewController: UIViewController {
    let topView = UIView()
    let imageView = UIImageView()
    let goButton = UIButton()

    override func viewDidLoad() {
        topView.frame = CGRect(x: 0, y: 0, width: 100, height: 200)
        topView.backgroundColor = UIColor.redColor()
        view.addSubview(topView)

        imageView.image = UIImage(named: "profile")
        topView.addSubview(imageView)

        goButton.frame = CGRect(x: 0, y: 0, width: 30, height: 30)
        goButton.setTitle("GO!", forState: .Normal)
        view.addSubview(goButton)
    }
}

…and so on and so forth.

Convert to initialization closures

With Swift, we can minimize the amount of code that is arbitrarily ordered in viewDidLoad and move most of the configuration into the same space that we use for property initialization. The Swift documentation mentions these as a way to provide property configuration but doesn’t give them a specific name, I’m fond of the term “Initialization Closure”.

By moving these configuration steps up to the point of initialization, we keep related configuration code together and keep view setup code in its proper place. After you’ve added ten other pieces of view into this view controller, you can still tell exactly where to go to change some configuration detail without digging through and entire view hierarchy setup.

class ViewController: UIViewController {
    let topView: UIView = {
        let view = UIView()
        view.frame = CGRect(x: 0, y: 0, width: 100, height: 200)
        view.backgroundColor = UIColor.redColor()
        return view
    }()

    let imageView: UIImageView = {
        let imageView = UIImageView()
        imageView.image = UIImage(named: "profile")
        return imageView
    }()

    let goButton: UIButton = {
        let button = UIButton()
        button.frame = CGRect(x: 0, y: 0, width: 30, height: 30)
        button.setTitle("GO!", forState: .Normal)
        return button
    }()

    override func viewDidLoad() {
        view.addSubview(topView)
        topView.addSubview(imageView)
        view.addSubview(goButton)
    }
}

In fact, now that we’ve decoupled configuration from view setup, we’re more free to place the view setup in what might be a more appropriate location, sometimes viewDidAppear, viewDidLayoutSubviews or likewise. I know that I was fond of keeping them all together in viewDidLoad simply because it was easier to group at all the configuration and setup together.

In most cases this is actually the behavior that we want; set up our properties when the parent object is initialized and then do the minimal amount of work to set up the view when it’s required. In rare cases where initialization takes a long time you might see a difference in behavior but these would be just as likely to cause a jerky view controller when placed in viewDidLoad. These highly latent tasks are better left off the main thread entirely, initialized after the parent object is created and placed in an optional property so you can optionally unwrap and tell if some asynchronous process has completed or not.

Storyboard people are people too

I know there are at least a few people who prefer to setup their views in Storyboards though and are feeling left out of the awesome Swift tool club right about now. Luckily there’s a solution for them too and it might just make you a storyboard convert. Just as we can customize get and set on properties, we can also provide our own implementation for didSet and willSet and then use them in conjunction with @IBOutlet.

I have to admit, I do like setting my views and constraints in Storyboards because I find myself tweaking element spacing constantly and it’s much more obvious how to move elements in the Storyboard preview than looking at the simulator and then guessing at hard coded numbers. One thing I don’t like doing in Storyboards, however, is configuring view details. The right pane in the Storyboard editor is a mess and if you can’t find the thing you want to customize, you don’t know if it’s just hidden or it simply can’t be customized in Interface Builder at all.

Not very clear which of these are defaults or how to share them between elements

The solution is to place your views and constraints in Interface Builder and then configure them in code. It’s surprisingly easy to do the basics in Storyboards, just to get a sense of what the scene will look like and how everything is hooked up and it improves searchability of your view configuration code. If you’re creating common styles across your whole app, you can even customize them in the didSet block rather than doing the same configuration each time.

class ViewController: UIViewController {
    @IBOutlet weak var arrivalLabel: UILabel! {
        didSet {
            arrivalLabel.text = "Arriving in 10 minutes".uppercaseString
            arrivalLabel.font = UIFont(name: "CirceBold", size: 11)
            arrivalLabel.textColor = UIColor.blueColor()
            arrivalLabel.textAlignment = .Center
            arrivalLabel.numberOfLines = 1
        }
    }

    @IBOutlet weak var departureLabel: UILabel! {
        didSet {
            Styles.setStandardLabelStyles(departureLabel)
        }
    }

Some gotchas with bad error messages:

  • Remember to call the initialization closure with (). I forget this constantly. Otherwise you’re assigning a closure, not the result of the closure, to some other type like UIView and you’ll get Cannot convert value of type ‘() -> _’ to specified type errors.

  • Another notable issue you might run into is Cannot assign value of type ‘NSObject -> () -> ViewController’ to type ‘ImagePickerDelegate’ or similar phrasing when trying to set a property to self inside an initialization closure. I suspect this is simply an issue with self not truly existing until all of the properties are initialized and an error message that only makes sense if you know the Swift internals. Luckily there’s an easy fix: just make the property lazy and self will exist when your initialization closure is run.

Here’s an example of setting up an ImagePicker as a property where we want to set up delegate and limits on how many images can be picked:

class ViewController: UIViewController {
    lazy var imagePickerController: ImagePickerController = {
        let picker = ImagePickerController()
        picker.delegate = self
        picker.imageLimit = 1
        return picker
    }()
}

Weekly Updates

This is turning into a bit of a weekly update during periods with lots of work which is OK, I think. If I’m doing a bunch of simultaneous projects it’s nice to have a mid-week checkup to see what we’re on-or-off course for but these days I’m doing a lot of contract Swift development and I try to keep my other projects to around an hour a day. I actually have a daily Coach.me task to put in an hour on some non-work project, so it’s less about keeping me from doing too much side project work and more about making progress on side projects even when I’m busy. I’m not sure the Coach.me app is the best way to manage building habits or reminding myself to do stuff every day - I basically ignore what seems like the bulk of the social features in the app - but it works for now.


I moved a few things to the archived pile this week. Ideas didn’t really belong on the active list. It’s not really “archived” either but that’s just where it goes for now.

After better-than-expected results from the livecoding project on That Thing in Swift last week, I expected it would be easy to do another video project in the form of something short and not-live. But instead I got stuck trying to organize and put together something cohesive rather than just going live. No change in plans to fix this, I just have to make the time to plan a couple minutes of content. Recording will be easy and learning some production will be an interesting challenge. Still planing on getting this done this week.

Holy crap it's March

March has definitely snuck up on me this year. Maybe partially because I have a lot of other work to do right now, days can be a bit of a slog to wake up, figure out which contract needs attention, build stuff all day, sleep, repeat. I definitely need to mix my days up a bit which was my intention when I said I was going to work out of some different locations a few weeks ago. Still have not gotten around to figuring out where those places are or when I would do this 😁

I made a few small tweaks to SPI Websockets to move the frame timing back to where it should be (in the spi package) but I’m still messing around with what designs I can actually build with it. I have to make a gif of the real thing vs the sim display before I can open source it. Afterwards I’m not sure about when I’ll get around to building something in it.

My first That Thing in Swift livecoding event was last week and went way better than expected. I built a small project in a little over an hour, had roughly 10 concurrent watchers the whole time and got some good feedback on Twitter afterwards. I did some digging into how to improve my setup afterwards and it seems cheap and straightforward to make some big steps up in quality, though I’m still not completely sold on the format. 1 hour is a long time to commit to watching a video!

I’m going to produce a few small (non-live) videos to go along with the most popular pages on the site (notably Singletons and Background threads) and post those at the top of the page in a new That Thing in Swift youtube account, we’ll see how many views and subscribers that gets us. Then we’ll figure out where to go from there!

Lastly on the project updates, I realized that I know very little about how Solar cell research actually produce power. I get the photoelectric/voltaic effect but there’s a big difference between knowing that physical process versus how to turn it into functioning electricity. I’m keeping notes on everything I learn and I’ll hopefully wrap it up in some regular posts here.


Treat has finally made its way to the archived pile. I still think the core idea is awesome, there’s just no great hook for why you want to use it in the first place. Surprisingly (to me), the fact that people use gift cards is not enough to justify the same people wanting to do the same thing (but better, obviously) on their phone. It’s still in the back of my mind and there are a few small things I want to do work on to feel out some assumptions but it’s not going to happen for a few months.

A big takeaway from the project is that I got wrapped up in this Startup culture and let those norms decide how I would build a company.

One thing that has really resonated with me since then has been this great, simple Startup Growth Calculator from @tlbtlbtlb. Here’s a shot of the model that makes sense with how I work:

The good Startup Growth chart

All the things on this chart are concrete and achievable. Spend $100 weekly? That’s way more than I usually spend to acquire users, initial investment for an engineer on their own project is mostly time. $45 weekly revenue? That might not be achievable on day 1 but it’s a low target that should be easy to hit if your project has any merit at all (no, I don’t want to make a “free” product where the customers are actually advertisers). 3% growth? That’s minuscule for a startup.

Let’s push the “profitability” back by 6 months since you’re not making $45 a week immediately. That’s still a single year to get to profitability, incredible. I know this is a simplistic model and you’ll probably want to grow faster by reinvesting or getting new investment during this time scales but this is what my year 1 plan should be for any project that I want to make money on. And your starting investment in the project is time and not quite $2000, not even enough to get your halfway through this month’s rent in SF.

The best part is all the way on the right (outside the frame of this screenshot) where it says “$100M/yr revenue at year 7”. If you’re on track for $100M/yr, there’s nothing that can stop you.

Basic Table View app with JSON Client

Here’s an hour-long livecoding video we did last week to make a basic table view app that downloads and parses JSON and builds a set of dynamic, expanding table view cells. Lots of helfup tips and tricks for working with Xcode and Swift are sprinkled throughout. The resulting code is available on Github.

Want to be notified when livecoding is coming up? Follow @nickoneill on Twitter.

Some relevant code snippits from the video so you can follow along:

This is our viewDidLoad override in our main view controller. Note the estimatedRowHeight so that we can automatically grow and shrink our table view cell sizes.

Our ColorClient (code below), fetches a list of colors and returns them to us as ColorBox objects.

override func viewDidLoad() {
    super.viewDidLoad()

    tableView.estimatedRowHeight = 125
    tableView.rowHeight = UITableViewAutomaticDimension

    ColorClient.sharedClient.getColors {[weak self](colors) in
        self?.colors = colors

        dispatch_async(dispatch_get_main_queue(), {
            self?.tableView.reloadData()

            if colors.count > 0 {
                self?.selected(colors.first!.color)
            }
        })
    }
}

The ColorBox object uses a failable initializer based on if we can correctly decode the correct data from the JSON file. Note the guard usage here!

struct ColorBox {
    let name: String
    let desc: String
    let color: UIColor

    init?(json: Dictionary<String, AnyObject>) {
        guard let name = json["name"] as? String else {
            return nil
        }
        self.name = name

        guard let colors = json["rgb"] as? [Int] where colors.count == 3 else {
            return nil
        }
        let color = UIColor(red: CGFloat(colors[0]) / 255, green: CGFloat(colors[1]) / 255, blue: CGFloat(colors[2]) / 255, alpha: 1)
        self.color = color

        if let desc = json["description"] as? String {
            self.desc = desc
        } else {
            self.desc = ""
        }
    }
}

Configuring our table cell display is simple and important. I always move this into a configure method on my custom table view cells.

class ColorBoxTableViewCell: UITableViewCell {
    @IBOutlet weak var colorView: UIView!
    @IBOutlet weak var titleLabel: UILabel!
    @IBOutlet weak var descLabel: UILabel!

    func configure(color: ColorBox) {
        titleLabel.text = color.name
        descLabel.text = color.desc

        colorView.backgroundColor = color.color
    }
}

The core of the app is a custom API client, based on the Swift API client we featured here previously.

class ColorClient {
    static let sharedClient = ColorClient()

    func getColors(completion: ([ColorBox]) -> ()) {
        get(clientURLRequest("videosrc/colors.json")) { (success, object) in
            var colors: [ColorBox] = []

            if let object = object as? Dictionary<String, AnyObject> {
                if let results = object["results"] as? [Dictionary<String, AnyObject>] {
                    for result in results {
                        if let color = ColorBox(json: result) {
                            colors.append(color)
                        }
                    }
                }
            }

            completion(colors)
        }
    }

    private func get(request: NSMutableURLRequest, completion: (success: Bool, object: AnyObject?) -> ()) {
        dataTask(request, method: "GET", completion: completion)
    }

    private func clientURLRequest(path: String, params: Dictionary<String, AnyObject>? = nil) -> NSMutableURLRequest {
        let request = NSMutableURLRequest(URL: NSURL(string: "https://thatthinginswift.com/"+path)!)

        return request
    }

    private func dataTask(request: NSMutableURLRequest, method: String, completion: (success: Bool, object: AnyObject?) -> ()) {
        request.HTTPMethod = method

        let session = NSURLSession(configuration: NSURLSessionConfiguration.defaultSessionConfiguration())

        session.dataTaskWithRequest(request) { (data, response, error) -> Void in
            if let data = data {
                let json = try? NSJSONSerialization.JSONObjectWithData(data, options: [])
                if let response = response as? NSHTTPURLResponse where 200...299 ~= response.statusCode {
                    completion(success: true, object: json)
                } else {
                    completion(success: false, object: json)
                }
            }
        }.resume()
    }
}

Leap Day Updates

I wanted to get one more update in before the end of February, luckily we have a leap day this year!

I’m planning a live coding session for That Thing in Swift on Wednesday this week. I still have a few technical things to work out but I’m not committed to it being perfect, just good enough to get a sense of how much interest there is. I think it could be pretty cool.

I need to do some more thinking about how to test theories related to Boundary Layer in the very early stage. I did a bit of research into creating wind tunnels to do proper experimentation and - surprise - there are super shitty versions made for high school science fairs and then models created for final Masters theses. Insert scathing comment on the lack of curiosity in the modern human. I’m still too early to build anything but it’s good to know I can at least create a mid-range experimental rig that essentially doesn’t exist yet.


I neglected to mention another new project last time, Deep Birding , which is an attempt to play with machine learning by classifying the many birds that come to eat seed in the backyard. I think it’ll be fairly straightforward to identify bird type given enough training data but I’d really like to be able to identify individuals. I’m not expecting magic, I could identify individual birds myself given enough time and footage but it would be pretty impressive to be able to do it with machine learning.

Two things stand out as difficult: (1) lots of the example image classifiers available already have the images cropped to the same small size for testing. We’ll need to preprocess frames, looking for areas that have birds and then cropping to our processing size. (2) If we want enough detail to identify individuals, that means a relatively large bird image size. Convolutional processing is super fast with small images and might be prohibitively slow with images large enough to contain enough detail.

I’ve already collected 20 minutes of 1080p video with a few different bird species pecking around. I’m still working through the TensorFlow examples and figuring out how everything works so results are still a ways off.

Smaller project progress

It’s been too long! Time for some smaller project updates:

I started and mostly completed a microproject I’ve had in mind for a while. A friend has a string of ~750 addressable LED lights (model APA102-C) around the top of his roof deck and they’re controlled by a Raspberry Pi SPI interface. Since all the LEDs are individually addressable, he wrote a bunch of Go to make different patterns in the lights and the code gets deployed directly to the Pi.

I started writing some patterns but they’re difficult to test unless you’re physically there so I wanted to write a “deck simulator” where I could see the output of my patterns locally and revise them until they’re good. No clue how I was going to start but I had some time I allotted as free and this jumped into my brain.

I ended up writing a swappable SPI Websockets library that has all the same interfaces as the real one but just forwards the spi data over websockets to whatever clients are connected. Then I wrote a simple visualizer in a canvas that interprets the data and draws all the lights. Some days I dread doing things that I don’t know really well because in contrast with how fast I can get stuff done in Swift, it feels frustratingly slow. Other days I’m OK with spending time learning something new.

So now I have to properly write the patterns I was planning on making in the first place 😂 I’ll post the code when I’m finished and give a quick wrap-up.

I got a ton of stuff done on the CMYK Website site for my brother two weeks ago, though not so much this past week. I was primarily wrapped up in getting some regular work done and being sick so not much extra time there. There’s some familiarity to it from my front end days but lots of new things to play with and APIs to work on.


I hit a big realization recently related to the work I do and the kind of thing I want to spend my time on. It’s definitely related to me coming off of Treat where I wanted to be a “startup CEO” and thinking more recently about going back to full time work. The core idea is that I shouldn’t let other people’s idea of success become my own. I’ve never been successful when I followed the normal thing to do and my favorite successes are when I’ve done something unusual and made it work. I have a pretty good idea of the box my successes fit into so I’ll be trying to be cognizant of those strengths.

One thing I really like to do is tackle big, weird problems that I have no (initial) expertise in and come up with new and different ways of doing things. I’m serious that it really interests me; I wake up thinking about these kinds of problems and it’s really motivating. I’ve always been a physics nerd but only way one works in physics professionally is by having your creativity beaten out of you over 6-10 years of rigid schooling. Obviously that doesn’t work for me but I’ve learned lots of fun stuff on my own over the years and occasionally I try to apply it in different areas. I’m not afraid of learning new things, particularly things that people think are “too hard” to learn outside of some structured learning environment.

One of the new projects I’ll be working on is a deep investigation into finding different approaches to minimize skin friction in aircraft. It’s one of those obscure subjects that I always do a bit of research on when I hear something related come up and I think I have some good ideas or at least directions to investigate. I’ll write up more about this particular project on its own soon but for now I’m calling it the Boundary Layer project.

On par for success

Success. Well, on par for success.

I’ve archived both PermissionScope and Pantry after finishing the maintenance releases I aimed to complete. I feel great not having those two things on my plate and I’m confident that I can deflect any new changes that might come through until a later date.

I don’t have a concrete plan for the next improvement to That Thing in Swift yet but I’m thinking about a few ideas. First, the community really enjoyed the post about writing your own API clients so I’m considering something along the same lines: a dependency that lots of people use that can be replaced with a small amount of good Swift. I like the idea because it’s different than what most Swift blogs write about - usually just an introduction to using x in Swift - and it requires a bit of creativity. I’d like to experiment with a few other ideas here, maybe some livecoding/video that incorporates actual code snippets that people can copy or follow along with.

Every time I think about finishing the work required for another Treat release, I keep coming back to the sending issue. Part of the reason that it didn’t work out is that there was no compelling reason to send a treat to a friend, even I didn’t do it that often. I’m hesitant to put more work into a part of the project that won’t fix a core issue. I still consider the sending issue every once in a while, I’m looking for a simple hook that could change the reasons for sending to something meaningful which would get me working on all those pieces again.


The last few posts have been new ideas! so let’s review: Pay by Tray is still an interesting idea but unless a restaurant owner who was really psyched about it fell into my lap, I probably won’t go anywhere with it. If that happens in the near future, I’ve already done enough thinking on it to ramp back up quickly enough. Successful projects (of this scale) require deep connections or lots of luck. I don’t have the former so I’ll keep it in the back of my head in case the latter appears.

Watercooler still fixes a problem I have (not enough social interaction while remote contracting) but I came up with a slightly different plan to tackle this for the time being which is probably better for me right now. This issue will probably be more prevalent in the future as remote work is more common and I still think it’s an interesting problem to solve (in an interesting way, not necessarily this one). In the meantime, you can sort of force this by just jumping on a random blab when you’re bored. It seems like most of the people there are in various states of boredom anyway.

I briefly looked into the tech I would need to build a stream of conversations from your friends on Twitter again. I came back to the idea after a while because it’s sticking in my head like a thing that might be a fun way to see what’s going on just outside of your social circle. And it seems like a thing that could be popular. I took a stab at it with pure js the other day but it looks like I will have to do some sort of oauth implementation which is more complicated than I wanted to get into. I then jumped over to Go to see if I could figure out the API calls needed to discover conversations in the first place but I ended up not wanting to spend a couple hours just getting back up to speed with Go. If I’m only interested in proving that it’s an interesting idea at the moment, I might as well do a quick swift implementation on the phone or iPad since that will be the least language friction (but UI still required).

I think I covered this before, but I’ll reiterate that ideas are super cheap and saying “No” (or just letting things die in this case) is not something that I’m concerned about. I like looking back on all this regardless of success.

Build log: Pay by Tray

Startups have improved on many UX aspects of takeout payments for places like your local coffee shop. Some of these improvements have been customer-facing like contactless payments and automatic tip selection, others are more business-focused like simpler ordering interfaces and better user management.

Very few of these improvements have been implemented in for in-house restaurant payment. We’re still waiting for servers to return with a bill, handing off credit cards, negotiating bill-splitting, calculating tips and waiting again before you can leave. There are a few high-integration apps which solve these problems but I don’t think I need to explain the downsides of requiring some of your party to have to download and sign up for an app to gain these benefits. Takeout payment successes have been primarily focused on business hardware and plenty of takeout payment apps attempting to simplify the process from the consumer side only have failed, in no small part due to the app download hurdle.

Pay by Tray simplifies the payment process for consumers in sit-down restaurants without forcing them to opt-in to some app. Businesses get to simplify payment for customers, gain extra time that waitstaff usually spend running bills and gain additional options for customer payment. No app required.

The product is essentially IoT for bill trays. There’s a nicely designed (draws your eye but at the same time feels familiar) bill tray that has a screen and an NFC reader (maybe a EMV dip slot). At the very least, this prominently displays your bill total. At most, you can pay on the spot with a single phone or multiple phones, splitting the bill and selecting a tip amount without doing any math or asking the waitstaff to go out of their way to split things 5 ways. A small but obviously visible LED on the tray indicates the state of the transaction - pending, paying, paid, etc - so waitstaff can glance at the tray to see that users have paid, particularly because after payment they can just get up and leave.


I’ve been thinking about this idea for a little more than a year - my first notes on this are from October 2014 - but it recently came up again and I dug into the competition to see what was currently available. So far I’ve only found apps that users have to know about and download in advance, thus plenty of effort has gone into making these apps as much about supported restaurant discovery as they are about the actual payment. I think that’s probably a distraction.

It might seem weird to have another build log for a new project so immediately after the initial build log for Watercooler but they’re distinctly different project types to me. Watercooler is a thing I can build just by throwing some hours at the engineering, Pay by Tray is a project I’d do a lot of research on and then go find some funding for a pre-product development cycle. A v1 product is mostly backend and hardware engineering, neither of which I’m very good at so I can’t really jump into the engineering anyways. Well, I can and most likely will just to get things started eventually but this is not an idea I can launch on my own so searching for buy-in from others first is the smart move here.

This has only been on my radar again in the last 48 hours so I’ll dig some more and ask around for feedback from friends next. This is always the most exciting

Build log: Watercooler / Workbreak

I’m diving deeper into the idea discussed last week about a mix of pomodoro timer and breaktime video chat that I’m calling either Watercoolor or Workbreak. No code yet, I’m thinking about the simplest tech for implementation and how to attract the first 100 users.

Actually, my primary concern right now is whether or not I should build the thing in the first place. I’m keenly sensitive to where I decide to spend my time right now (possibly as a result of this blog and my efforts to try and keep my active projects list short) and I was really hoping to break away from a strictly software based project and do something more interesting. However, the more I think about the project, the more I think I can put a basic version together with a minimal amount of work. Plus I like the concept! I think I would enjoy taking 5 minute breaks to chat with other people about projects.

Frontend choices

Obviously my first instinct was to build on iOS. Easy to do local notifications when your timer is up, easy to get video from the camera, etc. Distribution is the problem here. Distributing to randos is entirely through the app store (enterprise distribution is still too hard because it’s designed for enterprise) which means a level of polish that I simply don’t want to provide for a version 1. App icons of multiple sizes, app descriptions, privacy policies, app review - all these things make it hard to publish a true beta. And I want to build a true beta.

My second thought was a Chrome extension. I don’t really care that it’s not 100% of the browser market, it’s enough of the market that I’ll be able to tell if people want to use it. Easy enough to make a browser action button that displays the timer, easy enough to send notifications when the timer is up, easy enough to open a window to start a new break video session. I don’t know what it takes to publish on the Chrome extension store, it doesn’t seem like much effort. Obvious drawbacks are not having a fucking clue how chrome background extensions work other than the simple example case I went through and javascript 🤔

Lastly, I could still leverage Swift and make a quickie Mac app. Again, the syntax is straightforward, I’m sure AVFoundation (camera) is similar to iOS and distribution can still be done ad-hoc and gatekekeper-approved, particularly now that Mac dev certs are a part of the yearly developer membership. But organizing and building a menubar Mac app (I am so sorry, I know you don’t need another) is unfamiliar. There are unknowns and it feels a bit more “heavy” that a chrome extension.

Backend

Regardless of frontend platform, I will need a WebRTC server running somewhere, possibly with other negotiation servers (I’ve looked only briefly into this). It seems like there’s plenty of open source solutions and a $5 Digital Ocean box should cover enough usage to start. There are a few free services which I may use - PeerJS looks good but I’m unsure of how up-to-date it is since some of the examples are broken. Presumably you’d have to use JS for the frontend for this one too. Even if I used a free (or paid) service I still need to keep track of which clients are “on break” and looking for a connection. Despite the upcoming shutdown of Parse, I may still use it for this purpose! We have a year, after all.

Projects and Watercoolers

Many little changes since last time. I resolved the last remaining PermissionScope issue and the release went out just in time to get back on the Swift trending list on Github. 36 ⭐️ so far today, just passed 2000 overall! I would like to move this project to “archived” and defer any new work until later - for me, this is easy. I still have to figure out how to communicate this effectively to new PRs that come in 😬

I finished off a new post for That Thing in Swift regarding building your own API clients in Swift. It was definitely a hit, lots of tweets and talk about it which gave the site its best day ever (just over 2k uniques and almost 3k views 📈). Most of the traffic on a normal day is from organic search which increases naturally as more people learn Swift but my goal is to actually hit more first page search terms. It remains to be seen if just writing more posts == more search traffic.

I did a bunch more work getting Try Again category pages working. Now if you click on a project in a post, you’ll see all posts mentioning that project. I really think the color coded project names help a lot with this! I can scan a bunch of posts and identify the paragraphs mentioning that project fairly easily.

Pantry had some new, good pull requests which I merged in. I’ll be setting up a new 0.3 release soon but I want get releases working via fastlane so making a new release isn’t such a pain. Prototype here, make sure everything works OK and then I can move the process to PermissionScope .


Lastly, a new idea: I realize (now, finally) that working from home has some serious drawbacks in terms of socialization. Maybe this seems obvious to you but I never really considered how much I enjoy miss meeting new people and hearing about their projects and sharing my own. There are lots of ways to accomplish this, I’m trying to figure out which one is right for me.

A Virtual Watercooler

One idea I’m playing with is a combination of pomodoro timer and video chat. An app of some sort that times you for 30, 60 or 90 minutes of work and then connects you with someone else taking a break from work for 5 minutes of chat about what you’re working on and how it’s going, that sort of thing.

I actually like the idea that you’d run into the same chatters a few times over the course of a week, it gives you an opportunity to learn about the process other people are going through. It behaves a bit like a water cooler where you have a chance to run into a finite set of people but which one is semi-random.

Still thinking about how to set up a minimal test case without too much engineering. Probably just a website to start!

Write Your Own API Clients

Like many iOS developers, I used to use AFNetworking (along the same lines as the Swift counterpart, Alamofire) for all my networking needs. And many developers believe that the existence of such a library must mean that doing something similar is difficult or expensive. And previously it was! NSURLConnection in iOS 6 and earlier was a pain to implement and wrapping all that in something more convenient saved you a lot of time.

The truth is that since the introduction of NSURLSession in iOS 7, networking is pretty straightforward to do yourself and writing your own API client can simplify your dependencies. If unnecessary dependencies aren’t enough to convince you, think about the bugs you can introduce by including 3rd party code that you don’t understand or even the size of your binary if you’re including a large library just to use a small part of it.

A simple NSURLSession

I promised that NSURLSession was easy though, so let’s take a look at a simple example:

let session = NSURLSession(configuration: NSURLSessionConfiguration.defaultSessionConfiguration())

let request = NSURLRequest(URL: NSURL(string: "http://yourapi.com/endpoint")!)

let task: NSURLSessionDataTask = session.dataTaskWithRequest(request) { (data, response, error) -> Void in
    if let data = data {
        let response = NSString(data: data, encoding: NSUTF8StringEncoding)
        print(response)
    }
}
task.resume()

The first of the three major components is NSURLSession which, for the purposes of this post doesn’t need to be specially configured. It’ll handle all the data or download tasks we give it and call our blocks with the results.

Hopefully you’re already familiar with NSURLRequest which contains details about the request like the URL, method, any parameters, etc. The simplest configuration just takes a URL and defaults to the GET method.

And the last is the NSURLSessionDataTask which I’ve only explicitly created here for illustration. It contains the block that will fire when we get the results from the request. We’ll get back three optionals: NSData containing the raw body data from the response, an NSURLResponse object with metadata from the response and maybe an NSError.

Your own API client

Now that we’ve established our basic understanding of NSURLSession based , let’s use Swift to wrap these basics into a simple API client.

Here’s the core: a simple data task wrapper that takes a NSURLRequest and method name, and returns an indicator of success and a decoded JSON body. If you had an API that returned XML, you would modify the deserialization for XML rather than JSON but the rest would be the same.

Note the pattern matching in the where clause as we check the response code range for success!

private func dataTask(request: NSMutableURLRequest, method: String, completion: (success: Bool, object: AnyObject?) -> ()) {
    request.HTTPMethod = method

    let session = NSURLSession(configuration: NSURLSessionConfiguration.defaultSessionConfiguration())

    session.dataTaskWithRequest(request) { (data, response, error) -> Void in
        if let data = data {
            let json = try? NSJSONSerialization.JSONObjectWithData(data, options: [])
            if let response = response as? NSHTTPURLResponse where 200...299 ~= response.statusCode {
                completion(success: true, object: json)
            } else {
                completion(success: false, object: json)
            }
        }
    }.resume()
}

Next, we can wrap our common request methods into small methods that specify the HTTP method and pass through the completion block. This will make more sense once we put everything together at the end.

private func post(request: NSMutableURLRequest, completion: (success: Bool, object: AnyObject?) -> ()) {
    dataTask(request, method: "POST", completion: completion)
}

private func put(request: NSMutableURLRequest, completion: (success: Bool, object: AnyObject?) -> ()) {
    dataTask(request, method: "PUT", completion: completion)
}

private func get(request: NSMutableURLRequest, completion: (success: Bool, object: AnyObject?) -> ()) {
    dataTask(request, method: "GET", completion: completion)
}

The last piece of functionality that we want to simplify is the creation of a NSURLRequest with the data we want to send. In this case, we’re encoding the parameters as form data and providing an authorization token if we have it. This method will change the most from API to API, but its responsibilities will stay the same.

private func clientURLRequest(path: String, params: Dictionary<String, AnyObject>? = nil) -> NSMutableURLRequest {
    let request = NSMutableURLRequest(URL: NSURL(string: "http://api.website.com/"+path)!)
    if let params = params {
        var paramString = ""
        for (key, value) in params {
            let escapedKey = key.stringByAddingPercentEncodingWithAllowedCharacters(.URLQueryAllowedCharacterSet())
            let escapedValue = value.stringByAddingPercentEncodingWithAllowedCharacters(.URLQueryAllowedCharacterSet())
            paramString += "\(escapedKey)=\(escapedValue)&"
        }

        request.setValue("application/x-www-form-urlencoded", forHTTPHeaderField: "Content-Type")
        request.HTTPBody = paramString.dataUsingEncoding(NSUTF8StringEncoding)
    }

    if let token = token {
        request.addValue("Bearer "+token, forHTTPHeaderField: "Authorization")
    }

    return request
}

Finally we can start making requests with our API client. This is a simplified login request that issues a POST request to the login url with the email and password parameters. You can access both a generalized success indicator and a Dictionary object that might contain relevant data in this method.

func login(email: String, password: String, completion: (success: Bool, message: String?) -> ()) {
    let loginObject = ["email": email, "password": password]

    post(clientURLRequest("auth/local", params: loginObject)) { (success, object) -> () in
        dispatch_async(dispatch_get_main_queue(), { () -> Void in
            if success {
                completion(success: true, message: nil)
            } else {
                var message = "there was an error"
                if let object = object, let passedMessage = object["message"] as? String {
                    message = passedMessage
                }
                completion(success: true, message: message)
            }
        })
    }
}

Perhaps you want to retrieve and store a token once the user is logged in or turn the returned data into a struct before returning it to the calling method (my favorite!). These request-specific actions should be taken care of here.

We can create small functions like this for each of class of requests we’ll be making to our API and customize them to provide a consistent and simple experience for the calling code (probably in a view controller somewhere). We don’t need to worry about encoding values or generating NSURL objects because our thin wrapper takes care of those issues for us.


Here’s what I like about this approach:

Easy to reason about

We abstract away some of the parts that are technically uninteresting or repetitive but the code concepts of HTTP that you should understand are there: submit using a url, method name and parameters and get back an indicator of success and any decoded data.

Flexible for different APIs

The construction of your URL request is frequently the single detail that changes based on who wrote your server code. I don’t always have control over how this server implementation detail is done as a mobile dev so being able to customize this for each project is key.

Short and sweet

The base client is less than 50 lines of code. If I start having to write a ton of boilerplate to replace a dependency it begins to wear on me, particularly when it’s a utility that I’ll never touch again. This is short and you’ll be in here making adjustments and new methods frequently. You should know what’s going on in here!


Using this? Something else instead? How do you write your API clients? Let us know if there’s something you would change.

New Ideas

Unexpected benefit of this blog: I can collect stupid ideas in writing as well! Some ideas look really dumb after a day or two, others look even better. It’ll be nice to reflect on these after a week to see where they shake out.

A new take on Connect Four

I’ve been thinking for a while that I should try my hand at some sort of simple games on iOS. I love quick arcade-style games to unwind after a long day so I’m naturally drawn to creating something like that. Alternatively, I play asynchronous turn-based games with my Mother to keep in touch between phone calls and there aren’t enough good games in this model that are quick and fun.

I’ve been doing lots of technical interviews recently and one of them asked me to write up a connect four game in code. Most of it was just some Swift organizational yoga but detecting wins was a fun challenge and the solution I came up with involved simple row-wise detection of four subsequent same-colored pieces, and then each direction you could win in (row-wise, column-wise, diagonal-right and diagonal-left) just required translating the board matrix in that direction and doing the exact same check.

This got me thinking about building a quickie connect four iPhone game (the hard part is done! now it’s just everything else! you know this feeling). But the weird translational solution I came up with got me thinking about different ways you could play connect four. Rotating board connect four? Does that exist?

This sounds fun but I know that there’s a lot of work that goes into creating a polished app. I would probably start by creating something very basic and playing with connect four rotation to see if that is fun and weird.

Twitter Conversation Stream

For the most part I like the fact that you only see @-replies on Twitter to people you follow. Otherwise I’d be muting everyone who used Twitter more frequently (or way more frequently) than I do.

But I also like sometimes like digging into conversations that my friends are having with people just outside my friend group - or entirely outside. It would be nice to have a site that would find current conversations that my friends are part of and see the whole thing in context. And then they all flow by in a stream, just like individual tweets do (in a naive stream).

Probably just a web site connected to the Twitter API. I could even use their card rendering and do less of the styling work myself.

First week wrap up

Plenty of progress this week but no luck with paring down the list of “active” items to the ideal 2-3.

I cleaned up the rest of the potential items for a new PermissionScope release and made a change that I thought fixed the one remaining issue but it turns out not to be the case. Back to debug mode there.

I reviewed the one PR for Pantry and I’m just waiting for it to come back with some small changes before the 0.3 release is made. Still have not reached out to that contact about promotion though.

I did a little promotion for That Thing in Swift - unexpectedly, really - so some extra views early this week there. I got some positive feedback on a topic I started a couple weeks ago which I have a feeling will be relatively popular and well-shared. I will at least make progress on that post this week.

Mostly the beginning of this week was about catching up on some contract work. Seems like I’m ahead of the curve there at the moment so perhaps I’ll have more time to work on the tasks that I didn’t hit last week.

Definitely feeling the pressure to archive the VR Project , it’s stagnating a bit and I’m not quite sure where to go with it if I don’t have any contacts inside the sports organization that I’m aiming for.


I’m torn on if I should include interviewing as a separate project. It is definitely a big focus at the moment and takes up a good chunk of my time.

It’s sort of like a big meta-project: I’m talking to people about existing projects and new ones, trying to figure out what’s interesting and worth the time to dig into further. I’m fortunate enough to not be under pressure to pick something immediately and taking your time with job decisions is one way to have control over a process that is frequently out of your hands.

For now, it stays off the list.

Coffee and phone calls

I thought a couple weeks of interviews would give me some nice downtime to wrap up a few projects. Turns out NOPE, it’s just an endless series of coffee dates and phone calls.

A few people have warned me to be super picky - possible because of the incredible demand for iOS developers - which is a great position to be in but also quite daunting. I still want to go through the first couple of steps with most people, until the ‘cons’ list starts piling up at least.

Perhaps this is what normal non-engineer days are like? There are people who essentially have ‘coffee and phone calls’ as their job description. That would probably take some getting used to but not entirely impossible.


Still, a few things did get done in the first half of the week. I made the necessary fixes for a much needed PermissionScope release. It’s mostly cleanup and bugfixes but I think I let the whole open source thing get away from me a bit so this was an attempt at getting the project back under control where I understood everything that was going on.

Try Again is actually on the public internet now, albeit in very rough form. It’s the standard publish-with-hugo-sync-to-s3 method I’ve been fond of for a while. I’m still narrowing down how to manage all the project views in the sidebar. I think it’s going to require some fancy templating work but that’s what I’m good at (definitely the thing I was known for when working on Movable Type), plus Hugo has an interesting data-driven content tool that I’ve been itching to experiment with.

The remaining time was spent on the couple bits of contract work I have currently. I don’t find balancing client needs all that difficult when all I’m doing is contract work but when I’m trying to work on other projects or interviewing it starts to reach the conflict zone. Still, it’s not a ton of hours right now so it’s relatively calm.

Try Again

I tend to work on a lot of projects simultaneously. Actually, I try not to do them simultaneously, it messes you up if you’ve got to context switch too rapidly through your day. But I start lots of projects and put them aside for a week or a month when something else comes up. Sometimes they get revived, sometimes not.

And that means lots of failures. Either from lack of interest or time or both. I don’t think that’s necessarily a bad thing but there are two things I wanted to be more mindful about related to this process: being clear when I “archive” a project (decide to stop working on it) and having a better understanding of the stuff that I want to do and how long it’s been since I worked on it.

To that end, you’ll find my quick tracker on the left side of the page. It’ll highlight any projects mentioned in the current post or give you a list of everything on the main page. Plus it’ll show a visualization since the last time I posted about each project (hopefully equivalent to the last time I actually worked on it) and archived projects will be listed below that with an indication of if they’re “finished” or not.

The idea of something being “finished” isn’t super important to me. I’m far more concerned that I keep trying to learn new things than about bringing each idea into a fully formed state. Some ideas are interesting but a product that is based off those ideas isn’t. Who’s to say you have to make everything into a product anyways?

The important thing is that we try again.

So this is going to keep me honest. I want to report a few times a week on progress for each item that isn’t archived, forcing me to move forward or abandon an idea.

Ideally, I’d like to have 2 active projects at a single time and be strict about not working on archived projects until there’s time to do so. Maybe that means building a little backlog of PRs on github before I make a new release but that could be OK, I’ll give it a shot at least.

Wrapping up treat

It seems like we’ve reached an impasse with Treat . It’s been our focus for almost a year now and while we’ve learned quite a bit about what people want and don’t want, there hasn’t been enough interest in any direction to really warrant the continued effort in the product. That said, I still think two key points we got right will define whatever product wins the mobile gift card segment in the future:

  • You can send a gift card to anywhere (or nearly so)
  • Interactions with your friends during/after sending

The plan is to keep it as a side project so anyone with outstanding treats can still use them and new users can send them. I even have a couple new features to roll out that are mostly done before it really goes into cold storage: full on sender-to-receiver chat (powered by Layer) and a new way to get info about your treat location (business hours, photos, etc) will be heading to the App Store soonish.

I’ll probably write a longer breakdown of the issues faced once that release is out.


Other things for this week: I am writing posts for Try Again before it even exists! This is traditionally opposite of how I usually do things (build first, write later) which doesn’t often work out. In general I tend to gravitate towards the “hard” engineering work first and the actual content or validation steps later which may have been the root of some initial issues with treat 😁 So we’re giving the reverse process a shot.

I lied just a little bit: I did doodle a quick design for the blog and started working up a quick template in Hugo before I started writing this. But it’s by no means complete (I don’t even think I can see this post yet). So the plan is to see how much I like writing about current projects a few times a week and slowly build a local site around it just to see how it feels. I’d like to have a rough site by the end of this week.

I asked around for some connections related to VR Project . I should put together some of the research I’ve done in the case that I get a meeting. I already know one company with a similar goal, though their technology choices make me wonder if they’re competent. It’s a bit of a stretch but I’ll keep tabs on it until it plays out.

I must, must, must resolve the issues with the upcoming PermissionScope 1.0.2 release this week. We’re encountering more and more people creating issues for stuff that’s been fixed and not released so it’s starting to be a drain. Still no great plans for how to test the project because of the complexity of permissions on iOS. Still thinking about it. I’m happy with the contributions and progress for Pantry so far, I should review the enum support and get that pulled in this week. Also, I have a plan for getting a bit more attention for Pantry that I should try this week.

While we’re on Swift, I started writing actual technical posts on That Thing in Swift again during the break. I realized that I’m being dumb not capitalizing on the insane Google ranking I have for some swift search terms so I might as well put a bit of effort into expanding the topics covered. Most of the blogs/results are slow and littered with ads so the least I can do is give a non-shitty alternative. So far I’ve published a piece on guard statements and I’m working on why you want to write your own API clients (as opposed to ad hoc usage of Alamofire or something).

Guard Statements

guard and defer joined us in Swift 2.0 to little fanfare. Both use cases were somewhat obvious initially and plenty of articles were written about how to use these features. guard in particular seemed to solve a few sticky problems that Swift programmers got into frequently but a more in-depth exploration of real world usage of these concepts was lacking. We’ll cover guard today and possibly defer in the future.

Guard combines two powerful concepts that we’re already used to in Swift: optional unwrapping and where clauses. The former allows us to avoid the pyramid of doom or its alternative, the very long if let statement. The latter attaches simple but powerful expressions with the where clause so we can further vet the results we’re validating.

When to use guard

If you’ve got a view controller with a few UITextField elements or some other type of user input, you’ll immediately notice that you must unwrap the textField.text optional to get to the text inside (if any!). isEmpty won’t do you any good here, without any input the text field will simply return nil.

So you have a few of these which you unwrap and eventually pass to a function that posts them to a server endpoint. We don’t want the server code to have to deal with nil values or mistakenly send invalid values to the server so we’ll unwrap those input values with guard first.

func submit() {
    guard let name = nameField.text else {
        show("No name to submit")
        return
    }

    guard let address = addressField.text else {
        show("No address to submit")
        return
    }

    guard let phone = phoneField.text else {
        show("No phone to submit")
        return
    }

    sendToServer(name, address: address, phone: phone)
}

func sendToServer(name: String, address: String, phone: String) {
  ...
}

You’ll notice that our server communication function takes non-optional String values as parameters, hence the guard unwrapping beforehand. The unwrapping is a little unintuitive because we’re used to unwrapping with if let which unwraps values for use inside a block. Here the guard statement has an associated block but it’s actually an else block - i.e. the thing you do if the unwrapping fails - the values are unwrapped straight into the same context as the statement itself.

// separation of concerns

Without guard

Without using guard, we’d end up with a big pile of code that resembles a pyramid of doom. This doesn’t scale well for adding new fields to our form or make for very readable code. Indentation can be difficult to follow, particularly with so many else statements at each fork.

func nonguardSubmit() {
    if let name = nameField.text {
        if let address = addressField.text {
            if let phone = phoneField.text {
                sendToServer(name, address: address, phone: phone)
            } else {
                show("no phone to submit")
            }
        } else {
            show("no address to submit")
        }
    } else {
        show("no name to submit")
    }
}

Yes, we could even combine all these if let statements into a single statement separated with commas but we would loose the ability to figure out which statement failed and present a message to the user.

If you start seeing this kind of code appear in one of your view controllers, it’s time to start thinking about how to do the same thing with guard.

Validation and testing with guard

One argument against using guard is that it encourages large and less testable functions by combining tests for multiple values all in the same place. If used naïvely this could be true but with the proper use, guard allows us to smartly separate concerns, letting the view controller deal with managing the view elements while the validation for these elements can sit in a fully tested validation class or extension.

Let’s take a look at this naïvely constructed guard statement with validation:

guard let name = nameField.text where name.characters.count > 3 && name.characters.count <= 16, let range = name.rangeOfCharacterFromSet(NSCharacterSet.whitespaceAndNewlineCharacterSet()) where range.startIndex == range.endIndex else {
    show("name failed validation")
    return
}

submit(name)

You can probably tell we’re stuffing too much functionality into a single line here. Not only do we check for existence of the name field, we also check that the name is between 3 and 16 characters in length and that it contains no newlines or whitespaces. This is busy enough to be nearly unreadable, and it’s unlikely to be tested because we can’t validate the name field without interacting with the UI and submitting the name to the server.

Realistically, this view controller could be handling 5 inputs and each should be checked for validity before it’s submitted. Each one could look just like this, leading to a truly massive view controller.

Here’s a better example of real world guard usage.

func tappedSubmitButton() {
    guard let name = nameField.text where isValid(name) else {
        show("name failed validation")
        return
    }

    submit(name)
}

func isValid(name: String) -> Bool {
    // check the name is between 4 and 16 characters
    if !(4...16 ~= name.characters.count) {
        return false
    }

    // check that name doesn't contain whitespace or newline characters
    let range = name.rangeOfCharacterFromSet(.whitespaceAndNewlineCharacterSet())
    if let range = range where range.startIndex != range.endIndex {
        return false
    }

    return true
}

You’ll notice a few differences in the updated version. First, our name validation function is separated into a testable validation function (located either in your view controller or in a different, fully tested class depending on your preferences). isValid has clearly marked steps for validating a name: a length check and a character check.

Instead of cramming all that validation into the where clause, we simply call the isValid function from the where clause, failing the guard statement if the text is nil or fails validation.

Testing is great but the best part of this implementation is the clarity of code. tappedSubmitButton has a very small responsibility, much of which is unlikely to fail. View controllers are difficult to test on iOS using standard MVC organization (which, despite many new players, is still the clearest organizational pattern) so minimizing their responsibility or likelihood of failure is an important part of architecting your iOS app.


guard has clear use cases but can be tempting to use as part of a massive view controller. Separating your guard validation functions allows you to maintain more complex view controllers without loosing clarity or readability.

Pantry, a light struct caching library

Looking through one of my recent Swift apps, I realized how frequently I persist (or want to persist) little pieces of data.

  • Feature flags (does the user have access to x?)
  • User preferences (turn on/off reminder notifications)
  • Tracking flow (has the user been on this screen before?)
  • Sharing data (pre-populate fields with previously entered data)

And whenever I think about what to use for persistence, I think back to this post on NSHipster:

And that’s totally true for Objective-C. NSKeyedArchiver was the way to go for many projects. But we’ve come to expect a different definition of “Not a Pain in the Ass” since transitioning from Objective-C to Swift and for this case, I think we deserve something better than NSKeyedArchiver. Not just something written in Swift (of which there are a few) but something that feels at home with the rest of your Swift code.

This is Pantry, a simple and opinionated way to store basic types and structs in Swift with no setup

This started as a project to simply store native structs because that’s something that NSKeyedArchiver simply cannot do. I use structs everywhere and I was frustrated by having to turn those into @objc WhateverClass: NSObject if I wanted to persist them for any meaningful length of time.

It’s grown out of that initial use case to be slightly more general because that’s how I’ve been using it. As soon I realized I could store structs easily, I’ve started thinking about what I could accomplish by persisting basic types in a really straightforward way.

It’s best shown rather than explained, let’s get to a few use cases:

Simple Expiring Cache Functionality

At its most basic, Pantry is a nice cache layer for basic types. In this example, a feature is turned on or off by some expensive operation (network request, lots of processing, etc) but the status could change somewhat frequently so we don’t want to fetch it once and cache it forever.

Instead, we check for a Pantry value and report the results if it exists. If it doesn’t exist, we’ll do our expensive operation and then set the result as a cached Bool for 10 minutes.

if let available: Bool = Pantry.unpack("promptAvailable") {
    completion(available: available)
} else {
    anExpensiveOperationToDetermineAvailability({ (available) -> () in
      Storage.pack(available, key: "promptAvailable", expires: .Seconds(60 * 10))
      completion(available: available)
    })
}

At the end of 10 minutes, `Pantry.unpack()`` will return nil again and you can do your expensive operation to determine the status.

The benefit of using Pantry over some of the existing options like AwesomeCache or Haneke is that you can also store structs with minimal boilerplate code, so your cache that was maybe unstructured dictionary values with magic keys or multiple cache values is now just one strongly typed struct with transparent contents.

Automagic Persistent Variables

Perhaps the most interesting use case I’ve created when working with Pantry is the concept of a property on a class or struct that is automatically persisted across launches. This feels weird and unintuitive at first but I’ve found a few places where it’s immensely helpful.

Luckily, between Pantry and Swift, this is pretty easy to set up.

var autopersist: String? {
    set {
        if let newValue = newValue {
            Pantry.pack(newValue, key: "autopersist")
        }
    }
    get {
        return Pantry.unpack("autopersist")
    }
}

This is a standard property on your view controller or what-have-you. It’s written to disk whenever you write to the variable and read from disk whenever you read it. That’s nothing special by itself but the simplicity is what makes this a nice part of your overall view controller composition.

And, just like before, this is a simple example with a String where a struct with a few useful fields could be substituted.

The Alternatives

In both of these situations, you’d have to write a lot more code dealing with NSKeyedArchiver just to get this functionality working with the standard NSCoding compliant types. Defining where your cache lives, managing reading and writing and even thinking about how your data is stored.

With Pantry, you get one-line reads and writes for basic types and a minimal amount of setup code (just on the decoding step, not both ways!) gives you support for arbitrary structs. It’s significantly less effort than the alternative.

Goals for Pantry

A couple driving goals I have:

  • Ease of use/understanding
  • Minimal boilerplate code
  • Speed

And, just as importantly, things we don’t need to do:

  • Objective-C support
  • Queries
  • Cache format control

I want to be clear about the things I don’t consider important for two reasons:

a) A tool doesn’t have to support every use case. In fact, I’d say the best tools for the job are those that are built with a clear vision of one job in mind. And thanks to open source software, you can adapt this for another job if that makes it better for you.

b) The user doesn’t have to decide every detail. Yes, we could let you decide if you want your data in binary or plist format, or encrypted on disk. But that’s more decisions for you and more chance that some of you will get it wrong. Instead, we’ll do the work to make sure it conforms to our goals: easy, simple and fast.

Previously, Storage

I presented the notable parts of how Pantry works at Swift Summit SF in October only at the time it was called Storage. One persistent question was about how well this would hold up for large objects with lots of structs and sub-structs, or how to query these objects. I realized afterwards that the name Storage was misleading: it’s not a general purpose storage for your app but it’s great for these smaller use cases that I’ve outlined here. It’s still early enough that the change to Pantry was painless and quick.

For cases with large networks of objects, you’re always better off going with a real data store like Core Data or Realm. Pantry is never going to do those things because that’s not one of our goals. Plenty of people have devoted plenty of hours to make these tools great, you should use them as they’re intended.

But these things work great side-by-side. From my perspective, there is a need for minimal, easily accessible way to store and retrieve small data in Swift, regardless of your primary storage mechanism. Pantry is currently beta software but I’ve written lots of tests and I’m using it in production today. Come help out at github or just start using it in your projects with Cocoapods or Carthage.

Pantry is the second open source framework that has spawned from our work on treat - the first was PermissionScope which recently passed 1700 stars on Github. Get in touch if this kind of thing interests you.

New in Swift, November 2015

November’s top picks for new Swift libraries or tools! Plus a special rundown from Swift Summit in San Francisco.

The new Apple TV

The new Apple TV release means we have a plethora of new example code that runs on the device. Two notable items I saw were this emulator frontend Provenance and a streaming BBC frontend.

These represent the two styles of Apple TV apps you’re likely to see on your device: the standard style video streaming app and the more customized draw-whatever-on-screen app. If I were creating an Apple TV app and needed a place to start, I’d probably look at one of these.


PhoneNumberKit

For those of you using google’s libPhoneNumber to validate or parse phone numbers in your app, PhoneNumberKit attempts to be a pure Swift implementation of the same thing. Alpha software at the moment but this could be a much easier (and lighter!) way to use phone numbers in your apps.


fastlane deliver

Not new but new to me! If you’re frustrate with the process of uploading and filling in information for iTunes Connect during TestFlight or App Store distribution, deliver is for you.

It’s a simple command that keeps all your app metadata in text / image files with your project and can sync them up or down to iTunes Connect for you. The features around autodetection of screenshot sizes are awesome.

Fastlane, by the way, recently joined the Fabric team inside Twitter. Congrats to those involved!


Swift Summit SF

Swift Summit was held in San Francisco in the last couple days of October and yours truly presented and attended. A couple notes about code from the conference:

Kristina Thai’s talk on building watch apps hits my biggest complaint about watch apps so far; there are a million watch apps that do nothing useful. Really consider what interaction you’re building for before starting your watch app!

I haven’t worked much with futures/promises in Swift but I am a fan of using them for Javascript work. If you find asynchronous image loading or network requests a pain, give Thomas Visser’s BrightFutures library a shot. There’s also a bit of example code showing how BrightFutures can be used to improve existing code that was used during Thomas’ presentation here: https://github.com/Thomvis/SFSwiftSummit2015

If you’re starting to write your own protocols in Swift, I highly suggest keeping Greg Heo’s talk handy. It runs down the protocols in the standard library and should inform everything from naming to functionality in your own protocols.

Sam Soffes talked about building tables with Static. If you’ve experimented with protocols, structs and table views in Swift, you’ve probably come up with something similar but Static is fully featured and supported by Venmo.

There were a few more that I don’t see online yet, I’ll update as I find them.


Storage

Finally, to round out the code from Swift Summit, I live-coded the beginnings of a struct serialization library that I’m calling Storage.

Storage is native opinionated serialization for Swift. Other attempts at serialization want to re-create NSKeyedArchiver with all of its flaws but we can clearly do better with Swift. The goal is to have minimal code to store basic data, similar to how you might use NSKeyedArchiver or NSUserDefaults but in a swifty way that doesn’t feel burdensome.

Storage is on github now with preliminary support for archiving lots of types (including structs) with minimal boilerplate code. I’ll be writing a more detailed post about the use cases for Storage (which are many!) in the coming week so stay tuned. If you’re interested in helping out, please check our issue tracker!


As always, keep in touch on Twitter for more of this sort of thing during the rest of the month.

New in Swift, October 2015

Something new! I’m going to try branching out from our traditional Objective-C -> Swift format. To start, there are a lot of interesting Swift libraries popping up which I try to feature periodically on Twitter but you might miss them there, dear reader. I’ll summarize the best every month with a post here.

Instructions

Instructions

Coach marks are a little contentious in the app design world. The suggestion is that your app design should be clear enough that users know what everything does without having to be “coached” through it. I don’t have a clear YES/NO opinion on using them personally… I’ve used apps that explain every part of their UI with coach marks which is excessive. I bet minimal use of these could contribute nicely to your app.

My primary reason for including this is how damn beautiful it is. One could easily see an app that adds this component and makes these marks the nicest designed part of the app.


Unbox

Unbox is a JSON decoder that requires minimal boilerplate setup and has recently been updated to Swift 2. It really doesn’t get any simpler than this:

struct User: Unboxable {
    let name: String
    let age: Int

    init(unboxer: Unboxer) {
        self.name = unboxer.unbox("name")
        self.age = unboxer.unbox("age")
    }
}

UIStackViewPlayground

I knew stack views (new in the iOS 9 SDK) were supposed to be powerful but this collection of playgrounds really nails the point home. It shows off how to layout the iOS calculator view, a more detailed scientific calculator view, a pretty standard profile view, tweet view, mailbox view and iOS homescreen view.

I’m convinced that stack views can create anything. Now I just have to convince all my users to upgrade to iOS 9 so I can use them 😕


RateLimit & AwesomeCache

Here’s a related pair. AwesomeCache is a simple Swift cache that lets you put stuff away for later but with a really nice expiration mechanism:

cache.setObject("Alex", forKey: "name", expires: .Seconds(60 * 60 * 24)) // expire in a day

I use this all the time to cache API calls to data that rarely changes. It could use some update to be more Swifty and less NSKeyedArchiver-y but it’ll do for now.

For more short term and ephemeral “caching” you can try RateLimit which will only run a block as frequently as you specify. The given example is a perfect one: say you refresh a page in viewDidAppear: and you don’t want to overdo it when users are constantly navigating back and forth from a list to a detail screen. Wrap that refresh in a block set to 60 seconds and that screen will only grab new data every minute.

RateLimit.execute(name: "RefreshTimeline", limit: 60) {
    // Do some work that runs a maximum of once per minute
}

That’s all for this episode. Keep tabs through the month on Twitter or follow up every month here for a quick summary.

Great iOS Permission Dialogs with PermissionScope

from the original article I wrote on Medium

PermissionScope is an open-source permissions dialog inspired by Periscope, the broadcasting app purchased by Twitter recently. My goal was to create a permissions dialog that was flexible and clear for users, increasing the number of users who approved requests for any given permission. It should be easy for developers to configure and use so you can have a great permissions experience in your app even if it’s your first version.

Periscope vs. PermissionScope dialogs

The repo saw some good star-momentum last week but Github isn’t exactly the best place to go longform about the inspiration behind the code. We even saw a shoutout from Periscope founder @kayvz and some insight into the original inspiration from @mulligan at Cluster.

Every great product is born from some engineer frustration, right? Same with PermissionScope. I was struggling with how to present permissions when we were building treat. There are no existing projects that have kept up with the current state of iOS apps and provide a low-cost (a.k.a. low-time) way to ask for permissions. The super-slick contextual explanation flows are nice but do you want to spend time during your initial app release building one?

Practically every app gets iOS permissions wrong. The worst cases ask for every permission immediately on startup, barraging the user with a bunch of dialogs before they even know what your app does. I have seen this play out while watching people use apps over and over again and (unless your app is a personal recommendation), usually the answer is No, Reject, Disallow, etc.

This probably results in your app not working correctly. If you need Contacts permission to send invites and the user disallowed that permission, they’re probably not going to invite anyone to use your app.

Maybe this is “fine” because you’ve designed your invite screen to prompt them to reenable this in settings. But that’s not a good experience for anyone. And on the flip side, no one wants to waste their time implementing worst-case-scenario code in an MVP app.

Enter PermissionScope

PermissionScope a take on the permissions overlay from Periscope which really stuck with me. I haven’t seen a post from Periscope explaining their reasoning for building the original version but I knew it was the future of permissions right when I saw it.

I have been an advocate for responsible permissioning for a while but it’s not easy to do right. I was using ClusterPrePermissions which is a good way to alert your users that permissions are going to be asked for and give some explanation for why you need permissions. But users don’t read things, particularly things that look like default iOS dialogs.

Cluster PrePermissions

They (Cluster Inc) have a long post here describing the right way to ask for permissions which I generally agree with. The problem here was that the only publicly available code is the sucky pre-permissions dialogs, not the nice contextual ones.

Contextual permission flows tend to be fairly customized and hard to share across apps which is one of the reasons I jumped when I saw the Periscope version. It’s easily usable for the common scenario where one or more permissions are required to use the next screen in your app. It gives a basic amount of description for why your app needs the permission and it doesn’t look like a generic iOS dialog.

When to use PermissionScope

It makes the most sense to present PermissionScope when a user is tapping through to an action or flow that they cannot perform without providing permissions. This is what we mean by contextual permissions.

Plenty of apps have this sort of behavior somewhere in their apps:

  • User invitations need Contacts access
  • Camera apps need Camera and Microphone access
  • Image filter apps need access to pull and save from the Photo album

Sometimes this means you need more than one permission for a particular flow, like in treat. We need both contacts and location access so you can send a treat to a friend at a location.

Moving through the main flow for your app should be enjoyable. Each step is a tiny bit of success for the user and interrupting each one with permissions dialogs ruins the experience.

That’s why we present all the permissions at once, letting the user deal with permissions at their own pace and without asking them to context-switch back into your app flow two or three times.

We’ve included almost all the permissions available in PermissionScope so whatever your permissions requirements are, PermissionScope should cover it now or soon.

Optional permissions

If you’ve used the treat dialog, you might notice that Notifications permission is also optional. If you allow Contacts and Location, the “Let’s go” button is enabled and the user can move on without enabling Notifications. In addition, if the user opts to ignore Notifications on this first pass, we don’t ask them again until they hit a different required permission. Once all the required permissions are met, the prompt no longer appears on subsequent visits.

Why did we add notifications to this screen? It seems unrelated to the task at hand but we’re already asking you to approve stuff, why not take one more action? What were trying to avoid is random dialogs thrown in the users face while they’re still determining the value of your application.

I’m still not 100% on that behavior. I’d like to give the user another contextual way to turn on notifications when it really is relevant but I haven’t figured out how to re-prompt without feeling spammy. Still working on this.

Periscope also has a smaller version for just notifications that is a little more in-context for that permission. This feels nice and I’m considering extending PermissionScope to deal with these one-off cases more cleanly.

Do we still have normal permission actions? Sure, there’s a place for these. We still provide the basic location dialog for our geofencing setting. It works because it’s in direct response to a user action stating that they want some feature, unlike our initial permission dialog which usually occurs before the user knows how the app works.

Finally, if the user does reject the permissions for some reason, we make it clear what is preventing them from moving forward in the dialog and tapping presents a helpful link which sends them into Settings to reenable (I love this part but can’t take full credit, a pseudo-anonymous helpful committer laid most of the groundwork).

tl;dr

PermissionScope is a new way to ask for iOS permissions in-context. It’s on github with a nice example app. Also Github does not support emoji on headers in Readme files 🔒🔭

If you don’t want to build-and-run yourself, download treat and give it a shot. You’ll hit a permissions dialog when you send your first treat or if you redeem one you’ve been sent.

Common String Manipulations

Swift definitely eschews some traditional string manipulation patterns that we’re used to seeing both in Objective-C and other programming languages.

Say you’re not that familiar with Objective-C and you’re thinking of ways to test if a particular string starts with some other string. Maybe you’d try a regex first:

But for sure some people who have been writing Obj-C for a while will take offense to this. They’d rather do it this way:

And since we can bridge between String and NSString seamlessly, maybe that’s the way you’d do it too:

Hell, that’s the way I’d do it. It’s simple and clear, it doesn’t take any cleverness to figure out what’s going on. But - just for the exercise - we’re preparing for a day where NSString doesn’t exist anymore. How can we be most Swifty?

Ranges are a particularly confusing part of strings in Swift so at least this exercise will give us some insight into how they work. Firstly, our range from rangeOfString returns an optional (nil if it doesn’t appear in the string). Now (as of Swift 1.2) that we can make more complex if let statements, we can even check if the beginning of the range is the start of the original string, all in one line.

OK, so now that you’ve identified that a string starts with some substring, maybe you want to get the rest of that string?

Objective-C users will again cry foul: “We already have a way to do this!” And they’re right. Using substringFromIndex and counterparts is an easy way to get this done in Objective-C.

But what’s this? substringFromIndex in Swift no longer takes and integer but a String.Index?

Lucky for us, we have a working knowledge of String.Index from our range exercise earlier and we know we can easily coax one out of our starting string with startIndex.

But we’re using substringFromIndex which means we want to get a substring starting at some index after the start, so we need to get an index later down the string. Enter your new friend advance which will “advance” the string index by an integer amount of steps. Get used to this guy, he comes up a lot with ranges.

Finally we can use our familiar substringFromIndex method in Swift. The whole thing spelled out for you:

Writing files to the documents directory

Just a quick one today: Pulling the proper documents directory on iOS has always been a pain and a bit of code that I always forget. Here’s a reminder for you and I.

Remember on iOS that we can only write to our application’s documents directory. We’re sandboxed out of most of the system and other applications to save us from each other and we can’t write into to the main bundle because that would defeat our code signature.

In Objective-C, something like this would get us the current documents directory:

NSString *documents = [NSSearchPathForDirectoriesInDomains(NSDocumentDirectory, NSUserDomainMask, YES) objectAtIndex:0];
NSString *filePath = [documents stringByAppendingPathComponent:@"file.plist"];

And you typically find this paired with simple serialization of NSArray or NSDictionary objects:

// reading...
NSArray *objects = [NSArray arrayWithContentsOfFile:filePath];

// or writing
[objects writeToFile:filePath atomically:YES];

The Swift version is similar, but more compact with our more concise constants:

let documents = NSSearchPathForDirectoriesInDomains(.DocumentDirectory, .UserDomainMask, true)[0] as! String
let writePath = documents.stringByAppendingPathComponent("file.plist")

Note our new downcast syntax (as!) for Swift 1.2!

Reading and writing NSArray and NSDictionary is almost exactly alike, aside from checking the optional returned by contentsOfFile:.

let array = NSArray(contentsOfFile: filePath)
if let array = array {
    array.writeToFile(filePath, atomically: true)
}

This is nice if you’re doing something simple but often we’d like to deal with Swift-native Dictionary and Array. Luckily, it’s easy to convert between these older NS-types and our Swift natives. And the objects are much more powerful to deal with if you can cast them into their proper types:

let swiftArray = NSArray(contentsOfFile: filePath) as? [String]
if let swiftArray = swiftArray {
    // now we can use Swift-native array methods
    find(swiftArray, "findable string")
    // cast back to NSArray to write
    (swiftArray as NSArray).writeToFile(filePath, atomically: true)
}

That’s it. It truly is a wonder that I can’t remember it.

Finally, one thing to avoid. You may run into some old Objective-C code that uses this example:

// this returns an NSURL, *not* a NSString!
NSURL *documents = [NSFileManager.defaultManager URLsForDirectory:NSDocumentDirectory inDomains:NSUserDomainMask].firstObject;

I’ve had various permissions issues between the simulator/devices with file urls so I tend to avoid them in favor of path strings. You can go back and forth easily if there’s a particular API that demands one format or the other.

Switches and Optionals

I may be straying from our traditional “things you know how how to do in Objective-C" bit – unwrapping is not a thing we needed before Swift – but I can’t help but share this pattern I’ve been using.

As I get more and more accustomed to the places that optionals belong in my Swift code, I keep finding new ways to handle those clunky spots where they feel unwieldy. This is great because I really like the idea of optionals. There are so many ideas in programming that can be thought of as either always having a value or sometimes being nil, so the distinction is apt. Finding ways to handle optionals gracefully makes me even more convinced they’re a great choice for Swift.

One of those spots where optionals were feeling clunky was configuring UITableViewCell object from some state enum which happened to be optional because it was loaded asynchronously. Using if let blocks everywhere was a pain, particularly in this case because they were always immediately followed by a switch statement which was leading down the path to the Pyramid of Doom.

Here’s how it might have looked before:

// somewhere else we've defined our enum as such:
enum Status {
  case Available
  case Unavailable
  case Unknown
}

// unwrap...
if let status = self.status {
  // and then figure out our status
  switch status {
  case .Available, .Unavailable:
    print("a status")
  default:
    print("no status")
  }
} else {
  print("no status")
}

Fortunately, we can combine these two statements with some interesting syntax and then extend that to deal with optionals in different ways.

We know that optionals are actually an enum type made up of .Some(A) and .None. This represents the cases that we can encounter when we have an optional: either some type or nothing.

We can use this in our switch to check optionals without having to do that same step beforehand. Try this:

switch self.status {
case .Some:
  print("a status")
default:
  print("no status")
}

Sanity restored to our indentation. I mentioned configuring UITableViewCell instances previously because you need to look at your state in a few different places like cellForRowAtIndexPath: and didSelectCellAtIndexPath:. Trimming these down a level of indentation makes this feel like less of a pain and often you can combine two common states (no state and unknown state) in a single case rather than both the outer if let statement and the inner switch.

Now the extended part: even if you don’t configure your table views this way, you can still use this method when checking multiple optionals for nil. We simply make a switch statement where the only valid case for the inputs is .Some and the rest hit the default case.

Here’s a situation where you have multiple optional inputs to validate and not a lot of code needed to do it[1]:

switch (self.textValidation, self.passwordValidation) {
case (.Some, .Some):
  print("both look good!")
default:
  print("something was nil...")
}

There are a few more powerful uses for switch along these lines, including conditional cases with where and ignoring inputs with _ but hopefully we’ll get to those in another post.

The Swift switch continues to amaze and I doubt this will be the last time I bring it up on this blog. We’re almost a year into our public understanding of Swift and new ways to solve problems are still being “discovered.” That’s pretty great.

One more great example from @mmertsock. Say you want default-like behavior with an optional but without nesting your switches (one for the nil case, one for a non-nil catch-all case). You can use .Some(_) to match all cases where the switch is non-nil but still has any value!

switch (self.status) {
case .Some(.Available):
  print("status is available")
case .Some(_):
  print("some other non-nil status")
case .None:
  print("status was nil...")
}

[1] OK, I admit that this won’t be needed for long since Swift 1.2 will let us chain if let optionals but you might still use a switch for this considering how powerful and clear they are over lots of nested ifs and elses.

Sort and Sorted

I usually dread sorting in Objective-C because there are too many different ways to do it and too many magical syntax items that I can never remember. Swift simplifies a bit, building a more tightly coupled sorting mechanism into Array, though still relying on magical syntax comparators in some more complex cases.

The method in Objective-C that feels closest to Swift is probably sortedArrayUsingComparator: which should be given a block with two arguments of type id. The block then returns either NSOrderedAscending, NSOrderedDescending or NSOrderedSame depending on the ordering of the items - and it’s up to you to compare the two objects in the comparator block and determine the NSComparisonResult.

Here’s a simple example:

NSArray *numbers = @[@0, @2, @3, @5, @10, @2];
NSArray *sortedNumbers = [numbers sortedArrayUsingComparator:^NSComparisonResult(id first, id second) {
  if (first > second) {
    return NSOrderedDescending;
  } else {
    return NSOrderedAscending;
  }

  return NSOrderedSame;
}];

I have a couple issues with this. Most obvious to me is the usage of id in the comparison block. Objective-C doesn’t know the type information of the elements in the NSArray so it makes sense that you have to figure out what they are yourself. Lots of opportunity for runtime crashes here.

Second is the incredible verbosity of the block. You have to cover every result yourself and the compiler gives you absolutely no help.

Since we can use our standard Objective-C types in Swift, we could rewrite this exact thing with some AnyObject substitutions and slightly different syntax. It’s unpleasant, so I won’t even give you an example. However, Swift gives us a couple new tools that are better suited for the task.

If you were going to rewrite a way to sort things in Swift, you might end up with the sorted function:

func sortFunc(num1: Int, num2: Int) -> Bool {
    return num1 < num2
}

let numbers = [0, 2, 3, 5, 10, 2]
let sortedNumbers = sorted(numbers, sortFunc)

This provides us with a lot of type safety and some reduced verbosity. sorted knows that sortFunc only deals in arrays of type Int so we can’t create a sorting function where num1 and num2 are type String and use it here (it won’t even compile!).

You’ll notice we’re also providing a simple Bool result as opposed to an NSComparisonResult type. That’s simpler to understand and less work for us.

I think we can do a little better though. I usually like to sort arrays in place, and sometimes on a property of the objects listed. We can tackle both of these things in an easy to understand and Swifty way with the array method sort.

var numbers = [0, 2, 3, 5, 10, 2]
numbers.sort {
  return $0 < $1
}

By using sort, we’re sorting in place (the results will be in numbers, not another new array), using a trailing closure and removing the explicit types for shorthand argument names $0 and $1. The best part of all this shorthand is that we don’t loose any of the type information. The compiler will refuse any operation that we can’t do on an Int.

All that good stuff aside, the previous example might be better for an array of Ints as you sort Int arrays frequently. When we start dealing with more novel data structures this shorthand really starts to shine.

For example, when listing contacts from a user’s phone in a UITableView, it’s nice to provide a quick reference for letters with sectionIndexTitlesForTableView. I created a little data structure that looks like this:

class ContactLetter {
  let letter: String
  var contacts: [CellContact]
}

When sorting an array of ContactLetter objects, you want to sort by some internal property, like letter in this case. sort makes this incredibly easy:

self.contacts.sort {
  $0.letter.localizedCaseInsensitiveCompare($1.letter) == NSComparisonResult.OrderedAscending
}

And your contact list is nicely sorted for inclusion in your table view.

Value and Reference Types

Since we took a rather long hiatus before iOS 8 rolled out, I figure we would start again with a simple introduction to value and reference types in Swift as well as a test of our new demo playgrounds.

A couple weeks ago, Apple posted a short article about the difference between value and reference types in Swift. The short and long of it is that struct, enum and tuple objects are all value types and objects defined as class are reference types. Value type data is copied when you assign it around whereas reference type data is passed by reference and points to the same underlying data.

We’re used to dealing with reference types in Objective-C. For those of you coming from an Objective-C background, this example should not strike you as surprising:

DemoObject *obj1 = [[DemoObject alloc] init];
obj1.name = @"hello";

DemoObject *obj2 = obj1;
obj2.name = @"what";

// prints “what what”
NSLog(@"%@ %@",obj1.name,obj2.name);

Though it’s possible to pass around values in Objective-C, you’re probably used to this kind of thing because you deal with mostly NSObject subclasses, not a lot of base C types.

The difference in Swift is expressed succinctly in the Value and Reference Types post but I’ll reproduce the above example in Swift to demonstrate.

As a struct (i.e. a value type):

struct DemoObject {
    var name = "hello"
}

var obj1 = DemoObject()
var obj2 = obj1

obj2.name = "what"

// prints “hello what”
print("\(obj1.name) \(obj2.name)")

And as a class (i.e. a reference type):

class DemoObject {
    var name = "hello"
}

var obj1 = DemoObject()
var obj2 = obj1

obj2.name = "what"

// prints “what what”
print("\(obj1.name) \(obj2.name)")

Literally, the only thing different between the two examples is struct and class in the object definition. This effect is best seen for yourself. Download the example playground at the top of this post and try it out yourself.

Quick Help and Third Party Documentation

You may also want to check out the Swift Documentation post from NSHipster.

Beta 5 brought us some notable improvements in optionals and ranges but also the beginning of Quick Help in Swift. I didn’t realize that Quick Help was a “hidden” feature of Xcode until I mentioned it at the SF Swift Meetup last week and realized some were unfamiliar. As luck would have it, we’re now able to discuss how to document Swift in a similar way as our Objective-C.

First, a quick introduction to Quick Help in Xcode 5 or 6. Find a UIKit class or method in your code and hold your option key down while hovering over it. You should see a question mark cursor like this:

The Quick Help cursor

Clicking on the that link should bring up a small popover like this one with details on the class or method:

The Quick Help menu

This is all powered by inline documentation; snippets of text that precede class or method definitions and provide a quick look into the important parts of the code, like parameter and return types, or text describing cases where you might use the code. In Objective-C, there were a few different formats that you could use but in general documentation looked like this:

/**
  * Sends an API request to 4sq for venues around a given location with an optional text search
  *
  * @param location A CLLocation for the user's current location
  * @param query An optional search query
  * @param completion A block which is called with venues, an array of FoursquareVenue objects
  * @return No return value
*/
- (void)requestVenues:(CLLocation *location) withQuery:(NSString *query) andCompletion:(void (^)(NSArray *))completion {  }

Apple has lots of words around writing the kind of documentation it calls HeaderDoc and that format applies for lots of other languages, not just C-like ones.

However, like many things related to Swift, Apple has taken an opportunity to reboot the documentation platform with the new language. With Swift, we now have something that feels similar, but is not quite the same:

/**
Sends an API request to 4sq for venues around a given location with an optional text search

:param: location    A CLLocation for the user's current location
:param: query       An optional search query
:param: completion  A closure which is called with venues, an array of FoursquareVenue objects

:returns: No return value
*/
func requestVenues(location: CLLocation, query: String?, completion: (venues: [FoursquareVenue]?) -> Void) {  }

The formatting is based on an open source project called reStructuredText which, even though I lament the fragmentation of quick markup languages, seems particularly suited to documentation use with lots of ways to easily link to related code.

However, the Swift/Xcode 6 support is limited so far. You can create basic text, lists and just a few “field lists” (like :param: and :returns:), which is everything you need to add basic documentation but I expect more features to show up in the next few betas to round out support for this new documentation format.

So, as a reminder, if you’re writing code that has the remote possibility of someone else using or interacting with it, do them a favor and write some quick inline docs. You can think of it as a step 1 in planning a new method or class, just whip up a quick idea of what you want it to input and output, then go on to writing the code itself. Once your code settles into a semi-stable state, you’ll find it pretty easy to clean up your pre-documentation and add any extra details you may have discovered while implementing it.

Filling Table Views

Here’s a great example of how the language features in Swift take an old pattern and put a fresh spin on it - that is, they let us use less code and write more clearly.

If you’ve filled a UITableView programmatically that has the slightest bit of structure to it then you’ve probably run into Objective-C code that looks like this (from a contact page):

if (indexPath.section == 0) {
    if (indexPath.row == 0) {
        cell.textLabel.text = @"Twitter"
    } else if (indexPath.row == 1) {
        cell.textLabel.text = @"Blog"
    } else {
        cell.textLabel.text = @"Contact Us"
    }
} else {
    if (indexPath.row == 0) {
        cell.textLabel.text = @"nameone"
    } else if (indexPath.row == 1) {
        cell.textLabel.text = @"nametwo"
    } else {
        cell.textLabel.text = @"namethree"
    }
}

The first problem with this is the nested if/else blocks. This is a mess, particularly when the code changes indentations so frequently. It’s just plain hard to read. Secondly, there’s a lot of extraneous code in here. We could break indexPath.section and indexPath.row out into variables to reduce some of it but it doesn’t reduce the amount of code we’re writing overall by that much. Lastly, the indexes that we’re accessing are largely hidden. You have to follow the indentations to know where section 0 ends and then we use blanket else statements for the last item to reduce code at the expense of clarity. You really have to know the structure of the table view before you start editing this code.

My first instinct when rewriting this code was to use Swift’s improved switch statements on the indexPath which leads to less nesting and more clarity but the code is still filled with extraneous declarations for NSIndexPath objects. Enter tuples.

We can define a standin tuple that takes the indexPath values and then is easily created at each case statement with minimal code:

let shortPath = (indexPath.section, indexPath.row)
switch shortPath {
case (0, 0):
    cell.textLabel.text = "Twitter"
case (0, 1):
    cell.textLabel.text = "Blog"
case (0, 2):
    cell.textLabel.text = "Contact Us"
case (1, 0):
    cell.textLabel.text = "nameone"
case (1, 1):
    cell.textLabel.text = "nametwo"
case (1, 2):
    cell.textLabel.text = "namethree"
default:
    cell.textLabel.text = \\_(ツ)_/¯"
}

Note that we have to do something for the default case because switch statements must be exhaustive and we probably shouldn’t list every tuple of two integers. Instead we’ll just provide a default cell text that looks obviously broken if we run into it.

Now we have a clear idea of the structure of our table but with concise code that is obvious to anyone who needs to modify it in the future, all thanks to Swift switches and tuples.

Dequeueing Table Cells

Dequeueing a table (or collection) cell is almost entirely UIKit API calls and they translate directly to Swift. Since iOS 7 we’ve been able to dequeue a guarenteed cell (no optionals or nil checks needed, thanks @olebegemann) as long as we have a prototype cell in the storyboard or have used one of registerClass:forCellWithReuseIdentifier: / registerNib:forCellWithReuseIdentifier:.

First, in Objective-C:

- (UITableViewCell *)tableView:(UITableView *)tableView cellForRowAtIndexPath:(NSIndexPath *)indexPath {
	UITableViewCell *cell = [tableView dequeueReusableCellWithIdentifier:@"cell" forIndexPath:indexPath];

	cell.textLabel.text = @"A cell";

	return cell;
}

Pretty simple, dequeue a reusable cell and customize it to your liking. Then return the cell as requested. The same thing in Swift:

func tableView(tableView: UITableView!, cellForRowAtIndexPath indexPath: NSIndexPath!) -> UITableViewCell! {
	let cell = tableView.dequeueReusableCellWithIdentifier(cellIdentifier, forIndexPath: indexPath) as UITableViewCell

	cell.textLabel.text = "A cell"

	return cell
}

This highlights a big point for people coming from Objective-C to Swift, and one I’ll restate often: the APIs haven’t changed (or have changed very little) and you can use them just about as you did before. Transitioning to Swift syntax is the hardest part, particularly mentally translating all those Objective-C methods you remember into their equivalents in Swift.

In this case, we don’t have to think much about the new constructs in Swift to get to the optimal code. Balancing between the approach that we used in Objective-C and more Swift-like approaches (see Filling Table Views) is an important part of our job as developers, particularly during these first few months of Swift.

Background Threads

I was going to call this “Grand Central Dispatch” but then I remembered this is supposed to be digestible chunks of information about Swift, not huge diatribes about the state of such-and-such tool. So, let’s continue with the simple task we have set out for us: moving to and from the background thread.

We’ve stumbled upon an easy one here as the syntax is not significantly different than in Objective-C. First, the version we are accustomed to:

dispatch_async(dispatch_get_global_queue(DISPATCH_QUEUE_PRIORITY_DEFAULT, 0), ^{
	// do some task
	dispatch_async(dispatch_get_main_queue(), ^{
		// update some UI
	});
});

The only notable difference is that Swift code can use trailing closures, removing the need to remember to close the function parentheses later on:

let priority = DISPATCH_QUEUE_PRIORITY_DEFAULT
dispatch_async(dispatch_get_global_queue(priority, 0)) {
	// do some task
	dispatch_async(dispatch_get_main_queue()) {
		// update some UI
	}
}

Though if you’re using Swift and doing a lot of work in the background and taking action on main when that’s done, you may want to consider this clever operator by Josh Smith:

{ /* do some task */ } ~> { /* update some UI */}

Yes, you do have to include this other bit of code to use this operator but it really speaks to the power of implementing operators that do neat, compact things in Swift. Would I use it in code that someone else has to maintain? Maybe not.

Singletons

Singletons are a touchy subject in Objective-C. Plenty of people eschew the use of globals entirely and thus have no interest in implementing singletons. I prefer an approach that uses singletons in the cases where they’re the best (clearest, most functional) tool for the job, global-haters be damned.

If you’re not familiar, a singleton is an object which is instantiated exactly once. Only one copy of this object exists and the state is shared and reachable by any other object - I’m sure you can already see how this can be abused to form poorly constructed code.

Since I am not a singleton hardliner, I use them in Objective-C and I expect to use them in Swift as well. Let’s look at the old way:

@implementation SomeManager

+ (id)sharedManager {
    static SomeManager *staticManager = nil;
    static dispatch_once_t onceToken;

    dispatch_once(&onceToken, ^{
        staticManager = [[self alloc] init];
    });
    return staticManager;
}

@end

Usage:

[SomeManager sharedManager];

Yep, there are a few different ways to do this in Objective-C. I used to use the @synchronized pattern - and @synchronized is still the best way to do simple locking in Objective-C - but dispatch_once is the solution that matches the problem best and it’s the clearest implementation of what’s going on. For an unfamiliar programmer, it’s not exactly clear what @synchronized does. Even after you look it up in the docs it takes a moment to think through the different situations where it may be called and what the effects are. dispatch_once is simple. It does what it says and understanding the implications are pretty easy.

This line of thinking is going to influence our choice of singleton patterns because there are already a ton of ways to implement a singleton in Swift.

As noted in this github repo, at least three different ways to make singletons in Swift are remotely valid. Finding the correct one is a pain but if we apply the same principles as for Objective-C, I think we can pick a winner.

The obvious port of dispatch_once to Swift is understandable but it seems verbose for a common pattern in a new language. It turns out that we can construct a singleton using type properties in significantly less code:

class SomeManager {
    static let sharedInstance = SomeManager()
}

With usage:

SomeManager.sharedInstance

The downside of this approach is cluttering the global namespace. _SomeManagerSharedInstance is always sitting there, waiting for someone to stumble upon it. We can potentially solve this in future Swift releases with private global constants or private class constants, neither of which exist in Swift beta 3. Now that we can declare this shared instance private (as of beta 4), the global will only be available within this file and won’t mess with the global namespace.

For now, though, I think this approach is the most understandable. The alternative, nested structs, are confusing and the gain for no global clutter is minor, particularly because we shouldn’t have many of these singletons in the first place.

As of Swift 1.2 and static class variables, implementing a singleton has gotten significantly easier as shown above. It’s worth keeping in mind what a property marked static actually is: it’s a shared property between all objects of that class that can’t be overridden by subclasses (unlike using the class keyword). It’s usage extends beyond just the singleton pattern!

Method Signatures

While writing up remote notifications, I noticed that I hadn’t covered a relatively simple but important difference between Objective-C and swift. Method signatures seem like the first thing you learn in any language and they’re immediately useful knowing just the basics of writing signatures. However, the expectation that swift programmers know how to use slightly different Objective-C methods in our swift code adds some quirkiness to our understanding.

The case that brought this to my attention was translating the sentence-like structure of remote notifications delegate methods like this one:

func application(application: UIApplication, didRegisterForRemoteNotificationsWithDeviceToken deviceToken: NSData!)

This is a case of direct translation from Objective-C methods that don’t really look right in swift. The reason this works is swift’s external parameter names, which I think of as one of those features that might only be handy when using both swift and Objective-C. In short, functions can have a name used to pass a parameter into a function and a name used for that parameter inside the function.

A method can be defined like this:

func repeatThis(name: String, andDoItThisManyTimes times: Int) {
    for i in 0..&lt;times {
        print(name)
    }
}

So that when called it has that nice sentence structure, like Objective-C:

repeatThis("swift", andDoItThisManyTimes: 3)

But internally, the function references times, not andDoItThisManyTimes.

Remote Notifications

Remote notifications is an interesting case in swift because we’ve run into our first deprecated method. While we could technically use the old iOS 7 remote notification methods through the Objective-C bridge, Apple has decided that swift developers are all forward thinking and may not use deprecated methods. Hey, it makes some sense: deprecation is like a warning for existing production code. You should update this because it’ll probably break in the future! There’s no swift production code yet, so no need for the gentle treatment when it comes to old APIs.

Previously, with Objective-C:

[[UIApplication sharedApplication] registerForRemoteNotificationTypes:UIRemoteNotificationTypeAlert|UIRemoteNotificationTypeBadge|UIRemoteNotificationTypeSound];

Then you implemented the delegate callbacks:

- (void)application:(UIApplication *)application didRegisterForRemoteNotificationsWithDeviceToken:(NSData *)deviceToken {
	NSLog("Got a %@",deviceToken);
}
- (void)application:(UIApplication *)application didFailToRegisterForRemoteNotificationsWithError:(NSError *)error {
	NSLog("Couldn't register: %@",error);
}

Now, in swift code intended for iOS 8, things are a similar:

// somewhere when your app starts up
UIApplication.sharedApplication().registerForRemoteNotifications()

// implemented in your application delegate
func application(application: UIApplication, didRegisterForRemoteNotificationsWithDeviceToken deviceToken: NSData!) {
	print("Got token data! \(deviceToken)")
}

func application(application: UIApplication, didFailToRegisterForRemoteNotificationsWithError error: NSError!) {
	print("Couldn't register: \(error)")
}

But one more thing! Your application needs to separately register the types of notifications it can receive and this is the action that prompts the user for permission to show notifications.

let settings = UIUserNotificationSettings(forTypes: .Alert, categories: nil)
UIApplication.sharedApplication().registerUserNotificationSettings(settings)

Remember when these were joined at the hip in iOS 7? Apple is obviously encouraging developers to get the device token on startup, as is natural, and then prompting the user for permission later when you’re in the context of something that you want to be notified about. Seriously kids, don’t ask for permission immediately after your app starts up.

As extra encouragement, Apple has given us a few bonus methods to know more about the state of remote notifications. First, a delegate method that returns when you register your settings:

func application(application: UIApplication!, didRegisterUserNotificationSettings notificationSettings: UIUserNotificationSettings!) {
	// inspect notificationSettings to see what the user said!
}

And secondly, for when you’re just curious about the current state of notification permissions:

let settings = UIApplication.sharedApplication().currentUserNotificationSettings()

Since we can request specific permissions (.Alert, .Badge, .Sound) and then inspect the settings immediately after, we can know what settings the user has allowed and denied on a per-type basis. This is huge for app developers trying to figure out if a user is getting notifications.

Note the interesting method signatures for the new delegate methods! This is a case of external parameter names which you can learn more about in the method signatures post.

JSON Serialization

JSON serialization is essentially unchanged in Swift for one reason: it happens in foundation objects just as it did in Objective-C. Once we get the results back there are slightly different patterns for dealing with the data which we’ll see shortly.

The basics, in Objective-C:

NSData *data = ...some data loaded...;
NSError *jsonError = nil;
NSDictionary *decodedData = [NSJSONSerialization JSONObjectWithData:data options:0 error:&jsonError];
if (!jsonError) {
  NSLog(decodedData[@"title"]);
}

Lots of boilerplate, but still pretty simple. Now the same, in Swift:

let data: NSData = ...some data loaded...
let jsonError: NSError?
let decodedJson = NSJSONSerialization.JSONObjectWithData(data, options: nil, error: &jsonError!) as Dictionary<String, AnyObject>
if !jsonError {
  print(decodedJson["title"])
}

Yes, just like before when we had to know we were going to get back an NSDictionary from JSONObjectWithData:options:error:, we still have to cast the return from AnyObject to a Dictionary<String, AnyObject> (or whatever type is appropriate). Such are the perils of working with JSON. We could inspect the return type before using it for a more generic case but you’ll probably use the simpler example above when you already know the expected type.

But what! We still have to use & to pass a pointer to the serialization call! This is pretty un-Swifty and I suspect that a future where Apple is using Swift internally will deliver us more Swifty API calls. For now, at least understand that the & here doesn’t actually mean a pointer (there are no pointers in swift), but rather an inout variable. inouts are just markers to let functions know they can modify the parameters being passed in. The style is pretty C-like so I’m curious why it was included in the language, especially since we have multiple return values in Swift (hit us up for ideas on twitter).

Completion Handlers

We do a lot of asynchronous work on mobile devices in an effort to keep our code from blocking the main thread. Previously that meant a lot of delegate methods but more recent advances in Objective-C allowed us to return values to blocks as completion handlers. No doubt, we will have to do a lot of this in swift as well.

Here’s a function definition from Objective-C that makes use of the completion block pattern and the associated syntax to use it:

- (void)hardProcessingWithString:(NSString *)input withCompletion:(void (^)(NSString *result))block;

[object hardProcessingWithString:@"commands" withCompletion:^(NSString *result){
	NSLog(result);
}];

Thanks Fucking Block Syntax! I can never remember this stuff either

Swift is given some opportunity to improve on this since it doesn’t have to be some afterthought language addition, it can be baked in from the very beginning.

The result may look complex (as all functions-in-function-declarations do) but is really simple. It’s just a function definition that takes a function as an argument so as long as you understand nesting this should quickly become clear:

func hardProcessingWithString(input: String, completion: (result: String) -> Void) {
	...
	completion("we finished!")
}

The completion closure here is just a function that takes a string and returns void. At first this sounds backwards - this takes a string as an argument? We want to return a string! - but we don’t really want to return a string, that would mean we’ve blocked until we return. Instead, we’re calling a function that the callee has given us and providing them with the associated arguments.

Using completion handlers is easier than declaring them though, thanks to a clever way to shorten function calls from the swift team:

hardProcessingWithString("commands") {
	(result: String) in
	print("got back: \(result)")
}

This is a trailing closure, something we can use whenever the last argument is a closure. Using the somewhat strange {() in } syntax, we magically have the results that we passed the closure back in our async function. I really have yet to plumb the depths of swift to understand what makes this syntax tick, but for now I’m happy it works.

IBAction and IBOutlet

Gone are the days of switching back and forth between .h and .m files! And one of the tangible benefits of a single file per class is easy access to IBAction and IBOutlet declarations.

In Objective-C your .h would probably have a bit of this:

@interface MyViewController: UIViewController

@property (weak) IBOutlet UIButton *likeButton;
@property (weak) IBOutlet UILabel *instructions;
- (IBAction)likedThis:(id)sender;

@end

And then you constantly have to dig into your .h file when playing with storyboards to tweak names. Blah.

Simplicity rules in swift. If you have a property defined that you want to make accessible to your storyboards, just add the @IBOutlet attribute before your property. Similarly with @IBAction to connect storyboard actions back to code.

class MyViewController: UIViewController {
  @IBOutlet weak var likeButton: UIButton?
  @IBOutlet weak var instruction: UILabel?

  @IBAction func likedThis(sender: UIButton) {
    ...
  }
}

There are other interesting attributes that you can apply in swift but for now we’ll just cover these two common interface builder ones. There are two new interface builder attributes @IBDesignable and @IBInspectable which we probably won’t cover as their usage is very similar to this.

String Format Specifiers

We’ve all grown to love the string format specifiers doc from Apple and because it was baked into NSString, it was super easy to use in Objective-C. Here’s something you might do:

NSLog(@"The current time is %02d:%02d", 10, 4);

While standard string interpolation is useful in Swift, all the power of format specifiers aren’t available using the interpolation syntax. Luckily the format specifiers have been added into the String type during beta. While we can’t do this right from the Swift String type, we can easily use NSString to accomplish our goals.

let timeString = String(format: "The current time is %02d:%02d", 10, 4)

And since NSString and String are interchangeable in Swift, you can easily use the one formatter or another and pass the results right back to Objective-C or Swift.